
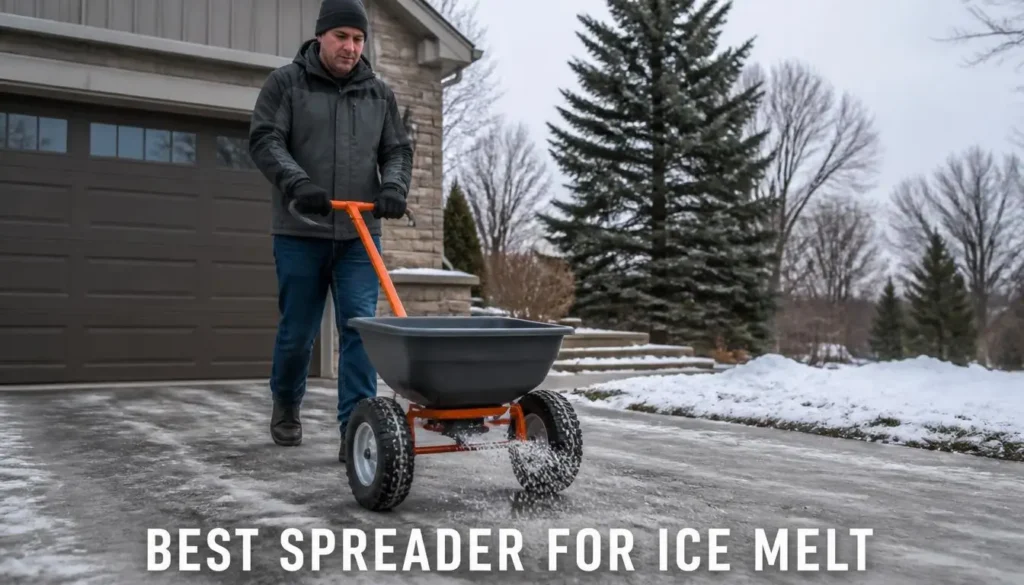
The best spreader for ice melt is the one whose maker allows your product in the hopper and that fits the pavement you clear. I am an agricultural engineer who, in large-scale production, verified seed drill calibration on weighing trays, and I handled these seven spreaders at my gravel yard and work pad before judging them.
Affiliate Disclosure: Garden Power Scout is a proud participant in the Amazon Services LLC Associates Program. As an Amazon Associate, we earn from qualifying purchases, at no extra cost to you.
My top pick, Agri-Fab 45-0462 Push Broadcast Spreader, pairs a 130 lb printed hopper with a chart row for ice melter in the maker’s manual. You get the top three, seven reviews and the safety steps that come before every fill.
Best Spreader for Ice Melt 2026: 7 Spreaders I Put to Work
I picked these for the winter job: steps, walks, driveways and long lanes. Each review says what the maker prints about ice melt and salt, where the hopper and the gate fit your pavement and where the spreader falls short.
1. Agri-Fab 45-0462 Push Broadcast Spreader Best Overall
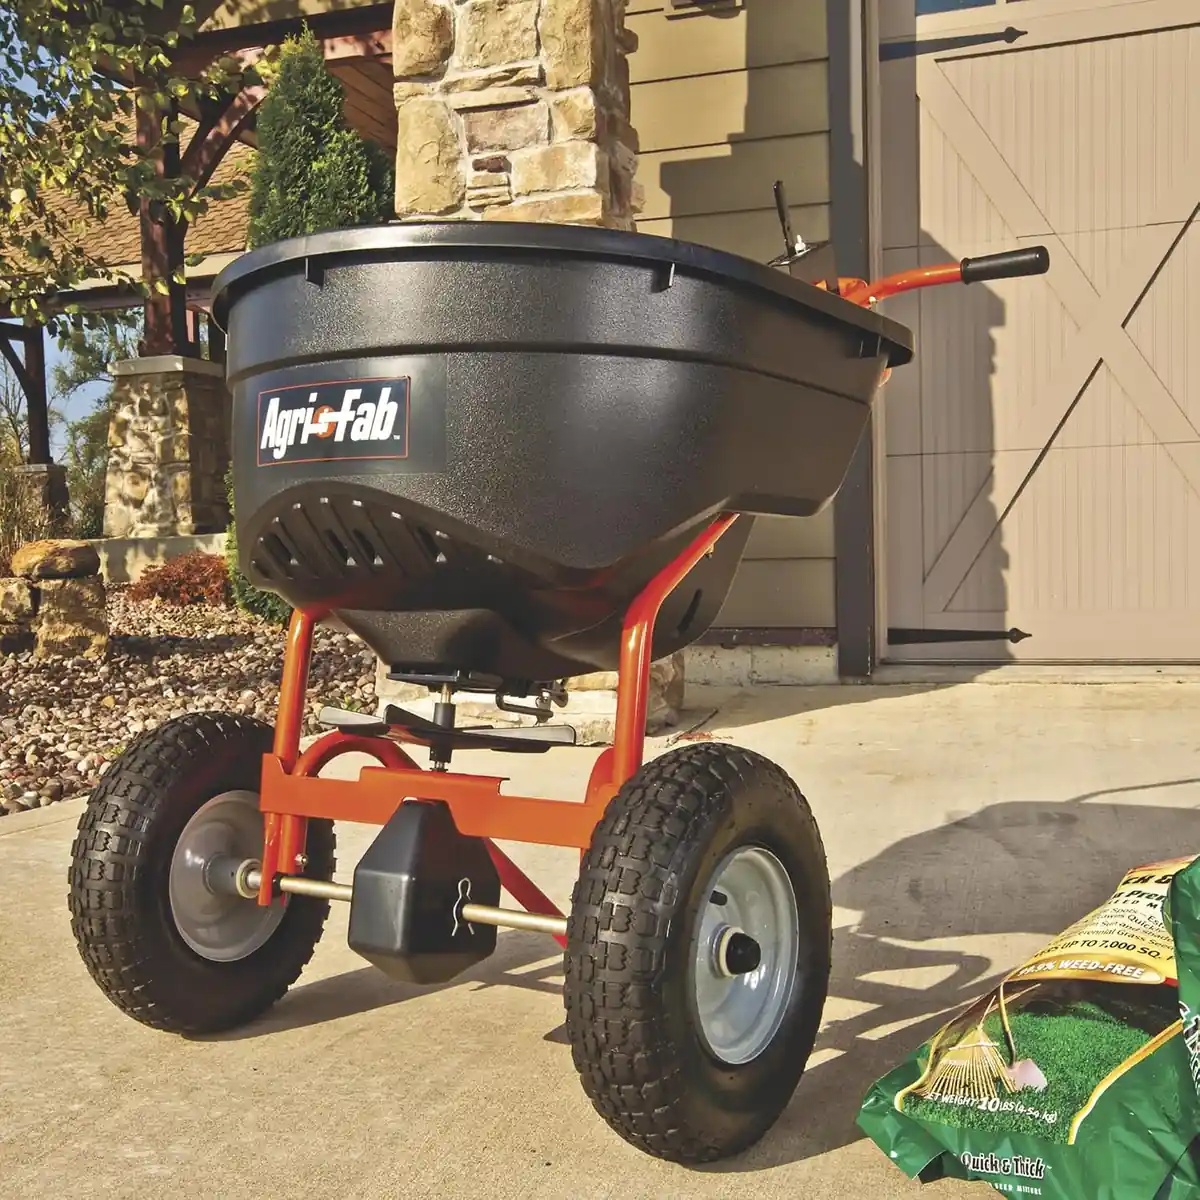
A 130 lb printed hopper on two big pneumatic tires is what sets the Agri-Fab 45-0462 apart from every other walk-behind on this page, and it is why it takes my top spot for a driveway and a long path. Agri-Fab’s own description lists ice melt in the winter among its jobs, and the application chart in its manual has an ice melter row. For a property with more pavement than one short walk, it is the best ice melt spreader I found.

WHY I CHOSE THIS ✓
I rank it first because it fits the job a winter spreader exists for: a driveway and a long path. The hopper is the largest of the push models here, the maker’s chart names ice melter, and the household warranty runs three years on the maker’s own sheet. The manual is short on safety wording, so I lean on the steps in the safety section below and the label of the product I load.
Agri-Fab 45-0462 Push Broadcast Spreader Specs
Key Features:
- Ice melter row in the chart: the application chart in Agri-Fab’s manual lists ice melter beside fertilizer and seed. Your product’s label and the manual still decide whether your material goes through it.
- 130 lb printed capacity: the largest hopper among the push models on this page, so a long drive needs fewer trips to the bag.
- 13 in pneumatic tires: the listing prints the size, and the manual says to keep them inflated and never above the printed maximum.
- Lever, gauge and stop: a control lever on the handle works the flow plate, and an adjustable stop on a numbered gauge limits how far it opens.
- Lever to OFF before turning or stopping: the manual says it in plain words, a habit every rotary spreader needs at the end of each run.
- Printed gearbox care: the manual walks you through opening the gearbox, greasing the gears and oiling the shaft, wheel and axle bushings.
- Three-year household term: Agri-Fab’s own warranty sheet gives three years from purchase, with wheels and bearings left out after year one.
Before you fill or reach into the hopper, complete the stop and make-safe steps in the safety section below. Then follow Agri-Fab’s order: fill with the control lever at OFF, start walking and pull the lever forward against the adjustable stop. Agri-Fab says to move the lever to OFF before turning or stopping, so on a long driveway I treat every end of the run as a lever-closing point.
The control side is the part I looked at longest. Before the first bag, the Quick Start Guide has you slide the control bracket until the flow plate in the hopper closes completely at OFF, then set the adjustable stop so the plate opens about half way and shuts fully again. Do that on the bench with the hopper empty, after the safe-state steps. The product label sets how much goes down, and the chart in the manual is a starting point, never proof of the amount delivered.
A winter tool earns its keep after the job. Agri-Fab says to empty the spreader after each use, keep leftover material in its original bag, rinse the inside of the hopper and the outside, dry it off and store it in a clean, dry area, with the safe-state steps done first. It is also the only push spreader on this page whose manual prints how to open the gearbox, grease the gears and oil the shaft. The manual says not to use powdered lawn chemicals and names no rule for salt, so treat the chart row as the maker’s list, not a promise about your product.
Walk the planned route once with the hopper empty and the lever at OFF, so every turning point is decided before product goes in.
Before you check or inflate the tires, complete the safe-state steps, and never inflate beyond the maximum printed on the tire, as Agri-Fab’s manual says. The manual also says to wear eye and hand protection when handling and applying lawn or garden chemicals.
Upkeep is a yearly oiling of the idler wheel and axle bushings, or more often as needed, plus grease when you open the gearbox. Assembly was the slow part: sixteen steps, a hammer for the hub caps and early bolts you must leave loose. The warranty leaves out tires, and in years two and three it leaves out hopper bearing, wheels and bearings, so plan for those wear parts.
Buy it if you clear a long driveway, a parking pad or a long path and want a hopper that suits the distance. Skip it if your jobs are a few steps and a short walk, where a hopper this large only adds weight to push. If your ice melt is rock salt, ask Agri-Fab before you load it: the manual is silent on salt.
FINAL VERDICT
The Agri-Fab 45-0462 is the spreader I recommend first for a long run of pavement. It gives the biggest push hopper, a chart row for ice melter and the longest warranty on the page. Read the label of your product and the manual before the first fill, and close the lever before every stop.
It is the push spreader for the long driveway.
2. Brinly P20-500BHDF-A 50 lb Push Spreader with Side Deflector Kit Best Premium
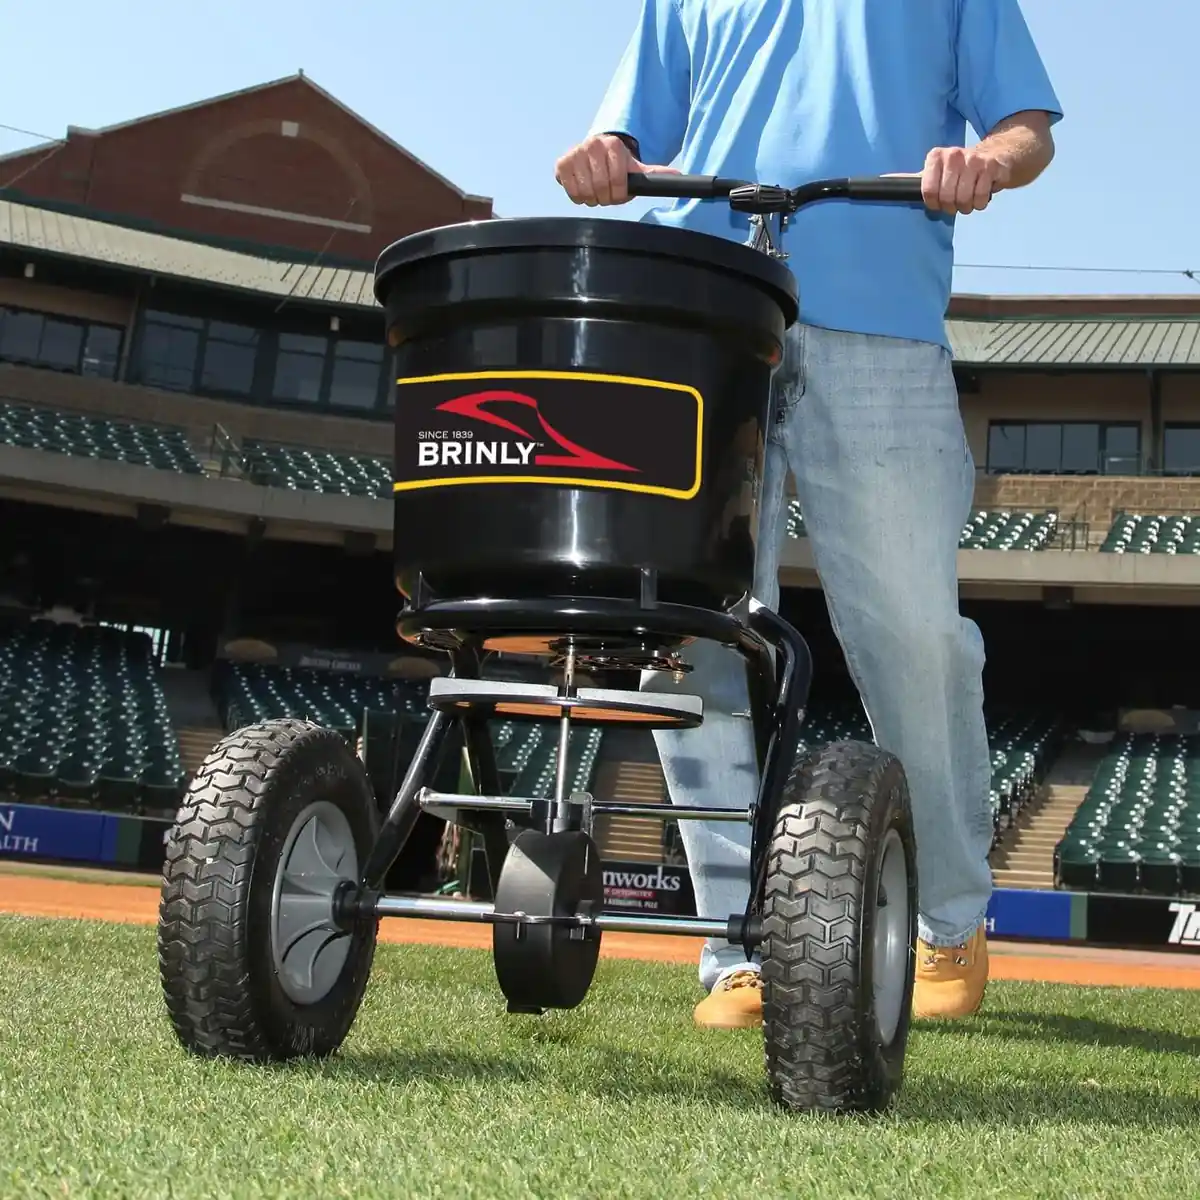
Brinly gives ice melt a box of its own in the P20 manual: take the screen out of the hopper, clean the spreader thoroughly afterward because ice melt can be highly corrosive, then put the screen back. That printed procedure, plus a side deflector in the box, is why the Brinly P20-500BHDF-A is my premium pick for a driveway that runs beside a lawn or a flowerbed. It is a 50 lb push spreader built for home use, and it tells you plainly what winter asks of it.

WHY I CHOSE THIS ✓
I put the P20 second because Brinly is the only maker on this page that writes out an ice melt procedure. The box is short, specific and honest about corrosion. The deflector kit and the rod-driven gate are extras I like on a driveway next to planting. It is the premium-tier pick here, and the manual earns the spot more than the price tag does.
Brinly P20-500BHDF-A 50 lb Push Spreader with Side Deflector Kit Specs
Key Features:
- Ice Melt box in the manual: Brinly says to remove the screen from the hopper, clean the spreader thoroughly when done and re-install the screen.
- Side deflector kit in the box: a flip-up shield on the left side that Brinly says keeps material from moving toward that side. What it does on your driveway is your result to check.
- Rod linkage gate: the flow control lever works the shut-off plate through rods, and the manual’s parts list shows no cable.
- Removable agitator: Brinly says to use the rotary agitator only if needed, so you decide whether it sits in the hopper.
- Hopper screen for clumps: the manual says to use the screen whenever you fill, except for ice melt, where it comes out.
- Adjustable handle height: moving the handle assembly to the upper bolt holes lowers it, a step printed in the assembly list.
- Wheels with a printed pressure limit: the manual prints a maximum inflation pressure and says not to drop below 70 percent of it.
Brinly’s first-use advice is the one I follow: become familiar with the spreader before any material goes in, and practice opening and closing the rate gate at the right moments. The gate opens after the spreader is moving and closes while it is still moving, because opening it at a standstill only dumps product on the ground. I walked it empty across the gravel yard and onto the concrete pad, working the lever at each turn until the timing was automatic. The stop and make-safe steps in the safety section below come before any filling or hands-on step.
The deflector is the part I handled most. Complete the safe-state steps in the safety section below before you adjust it. After the assembly steps, it takes two screws out of the left side of the hopper frame, a mounting plate and a carriage bolt with a knob. Loosen the knob and the shield rotates up or down. Brinly’s manual says the shield keeps material from moving toward the left side of the hopper, and makes no claim about a path or a bed.
Ice melt day is the second job, and the manual changes the routine. Complete the safe-state steps in the safety section below before you touch the hopper, then take the screen out before you fill, since the box says the screen comes out for ice melt to prevent damage. Brinly says to clean the spreader thoroughly when you finish, and the care pages add that ice melt residue is especially corrosive and that the spreader should be cleaned and oiled immediately after each use. I tipped it up on the work pad afterward and looked at the underside of the hopper and the plate for build-up. Put the screen back when the job is done, as the box says.
After an ice melt job, put the hopper screen back before the next product goes in, as Brinly’s box says.
Brinly says not to use the spreader on windy days. It also asks for eye protection, substantial footwear and long trousers, and no loose clothing near moving parts.
Living with it means a thorough clean and a light oil after every ice melt job, plus a periodic check that every nut, bolt and screw is tight. Brinly says to sand lightly and paint with enamel where rust shows on frame parts. The assembly wants two 10 mm wrenches, a linkage nut that gets a wrench only on its lower nut, and the spreader tipped onto its right side for the deflector. The residential warranty is the weak spot: tires, wheels and drive gears carry 90 days in the 2022 edition.
Choose it if your driveway or walk borders a lawn, a bed or a hedge and you want a maker-written ice melt routine to follow. Skip it if you clear a large lot, where a bigger hopper saves trips, or if the spreader will work commercial or rental jobs, which the warranty excludes. Read the manual’s Ice Melt box before the first fill.
FINAL VERDICT
The Brinly P20-500BHDF-A suits a home driveway beside planting, where its deflector and its written ice melt steps both get used. Choose it for the procedure on the page. Pair it with the label of your product and the manual before every winter fill.
It is the spreader whose manual spells out ice melt day.
3. SOLO 421 20 lb Chest-Mount Crank Spreader Best Value
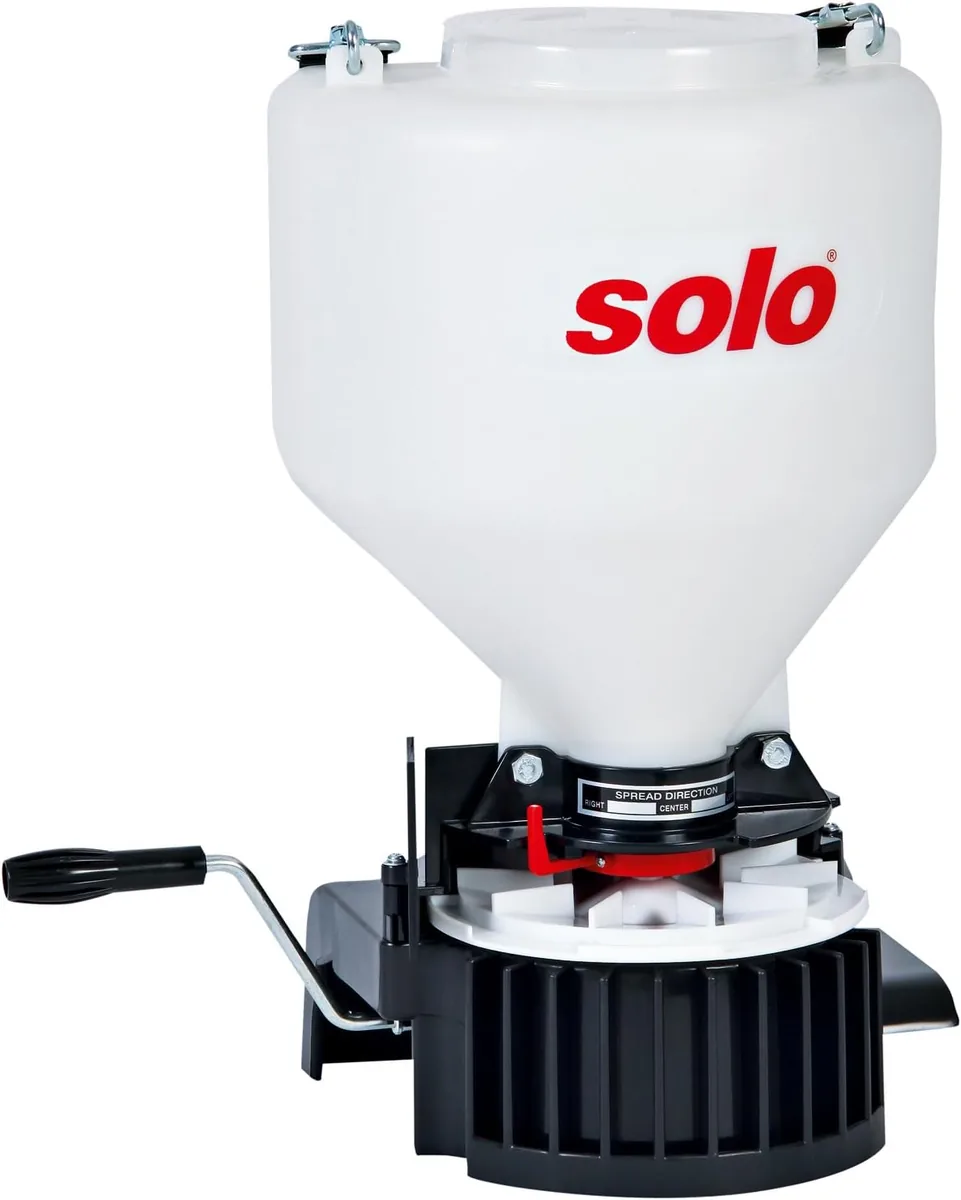
The SOLO 421 hangs from a cross-shoulder strap at chest height, which SOLO says lets you work over irregular ground more conveniently than a wheeled spreader. Its manual’s list of materials names ice melters, salt and sand, so the maker has written the winter job into the product. It is my best-value pick for steps, walks and a short drive, and the weakest tool on this page for a long driveway.
WHY I CHOSE THIS ✓
I chose the SOLO 421 for the value on small winter jobs. The manual names ice melters and salt, the empty weight is printed at 5.5 lb, and the controls are simple enough to learn in one pass along a path. It earns Best Value for steps, walks and a short drive, and for nothing larger. The hopper holds 20 lb and the arms do all the work.
SOLO 421 20 lb Chest-Mount Crank Spreader Specs
Key Features:
- Materials list that names winter jobs: SOLO’s manual lists ice melters, salt and sand beside seed and fertilizers. Your product’s label and the manual still decide your material.
- Chest-mount carry: the strap takes the weight on your shoulder and puts the crank at chest height, so no wheels have to find footing on a slick walk.
- Directional lever: center, left or right, so the throw can be pointed away from a wall, a car or a step. Walking in the new direction also changes it, the manual says.
- Deflector shield: SOLO says it widens or narrows the spread, and you set it before you start moving.
- Flow limiter stop: a stop nut on the flow rate lever limits how far the gate opens, so a lever pulled hard does not open it wider.
- Built-in agitator: the manual says it turns steadily while you crank, so there is no separate part to remove or lose.
- Screw-on lid: the lid goes on after filling, and SOLO says it keeps spillage and dust away from you.
You run it with two hands that do different jobs: the right hand turns the crank, the left moves the flow rate lever, and the manual says to keep hands away from the rotating impeller. I fitted the strap on a bench at waist level, set it to its longest reach first, then cranked the empty unit to check the height before taking it out. Set the deflector and the directional lever before you start walking. The stop and make-safe steps in the safety section below come before any filling or hands-on step.
A chest-mount spreader moves the workload from your legs to your arms and shoulder, and that is the trade. SOLO’s manual warns against bending at the waist, so you bend at the knees, and it says not to load the hopper while carrying the spreader. Filling is a two-step job with the unit set down. A sore back, tired arms or slipping attention means stop and rest, so I plan this tool for jobs a 20 lb hopper suits.
Winter footing is where the manual earns its keep. It says to be sure of your footing, use extra caution in wet or slippery areas and walk, not run, in closed-toed shoes with good traction. It asks for safety glasses or eye shields, non-slip gloves, snug long sleeves, tightly cuffed or cuffless pants and tied-back hair, with a respirator if appropriate for the material. When spreading chemicals it asks for protective clothing, a respirator and eye protection. For cleaning, complete the safe-state steps first, then follow SOLO’s soap-and-water wash, dry the unit and store it in a safe place.

Wind behind you, SOLO says, if you can plan the work that way. On a walk that runs with a hedge on one side, I plan the direction of the run before I put the strap on.
The manual’s lubrication point is a small oil hole in the gear case. Complete the safe-state steps first, and add oil only as the manual says.
Upkeep is short: check all bolts, nuts and screws at frequent intervals, keep every safety device in place and oil the gear case where the manual points. SOLO says not to use the spreader if it has been dropped or damaged until it is repaired. Assembly is the demanding part: the crank handle and strap come inside the hopper, you thread the crank on yourself and tighten the jam nut, and the strap needs its own fitting routine. No warranty term is listed.
It suits you if your winter jobs are steps, a porch walk, a path to the shed or a short drive, and you want a tool you carry. Skip it if you clear a long driveway or have a shoulder or back that tires, because the crank work adds up. Read the label of your product and the manual before the first fill.
FINAL VERDICT
The SOLO 421 is the value choice for the small winter jobs around a house. It carries on one shoulder, names ice melters and salt in its manual and weighs 5.5 lb empty. For a long drive, step up to a wheeled spreader.
It is the chest-mount spreader for steps and short walks.
4. Agri-Fab 45-0463 130 lb Tow-Behind Spreader Best Tow-Behind
For a long lane or a lot with acres of pavement, walking behind a push spreader stops making sense, and that is where the Agri-Fab 45-0463 belongs. It is the only tow-behind ice melt spreader on this page, with a 130 lb hopper and a universal hitch that the listing says fits riding mowers and lawn tractors. Its manual chart has an ice melter row. My Agri-Fab tow behind vs push spreader comparison puts the 45-0463 beside the 45-0462.

WHY I CHOSE THIS ✓
I chose it because nothing else on this page spreads from a vehicle. If your lot is larger than a walking spreader suits, this is the one to look at. Treat the towing speed, the slope lines and the vehicle manual as limits.
Agri-Fab 45-0463 130 lb Tow-Behind Spreader Specs
Key Features:
- Rod-driven flow plate: a steel rod and a control arm open and close the plate from the seat, with a locking notch for off.
- Ice melter row in the chart: the application chart lists it beside fertilizer and seed, and the manual does not recommend powdered lawn chemicals.
- Universal hitch: a hitch tube and bracket with a pin and hairpin cotter, within your vehicle manual’s limits.
- Pneumatic tires: the listing prints 13 in x 4 in, and the manual says to check inflation before each use.
- Printed towing limits: the manual says to start in first (low) gear with the engine at low speed, raise speed gradually as conditions permit and never exceed 6 mph for this model.
The wheels turn the gears, the gears turn the impeller, and a rod puts the gate in your hand. Agri-Fab says to start the vehicle moving before you open the flow plate and to close it before turning or stopping. Before you hitch, fill or reach near the impeller, complete the tow-behind steps in the safe-state box in the safety section below. Agri-Fab asks for eye and hand protection and substantial footwear, and puts your towing vehicle’s manual first.
Assembly ran to seventeen steps with a hammer, pliers and four wrenches, and the hub caps are tapped on. I left the bolts loose until the hopper sat on its support tubes, as the manual says. The locking notch for the off position surprised me, a small gate that holds the arm shut. I go through this model in more depth in my Agri-Fab 45-0463 review.

Agri-Fab says the optional hopper cover is not a rain cover.
Stay off steep slopes and away from creeks and ditches, as Agri-Fab says.
Upkeep means checking tire pressure and fasteners before each use, then rinsing the hopper inside and out and letting it dry before storage, with the safe-state steps first. I seated the hitch pin and hairpin on the bench and checked the arm in both positions. The warranty covers the original purchaser and needs proof of purchase.
Pick it if you own a riding mower or lawn tractor and clear a long drive or lane. Skip it if you have no towing vehicle or only a short walk.
FINAL VERDICT
The Agri-Fab 45-0463 is the tow-behind choice for large pavement, with the gate in your hand and the limits in print. Without a towing vehicle, a push spreader is the right tool.
It is the tow-behind spreader for a lane too long to walk.
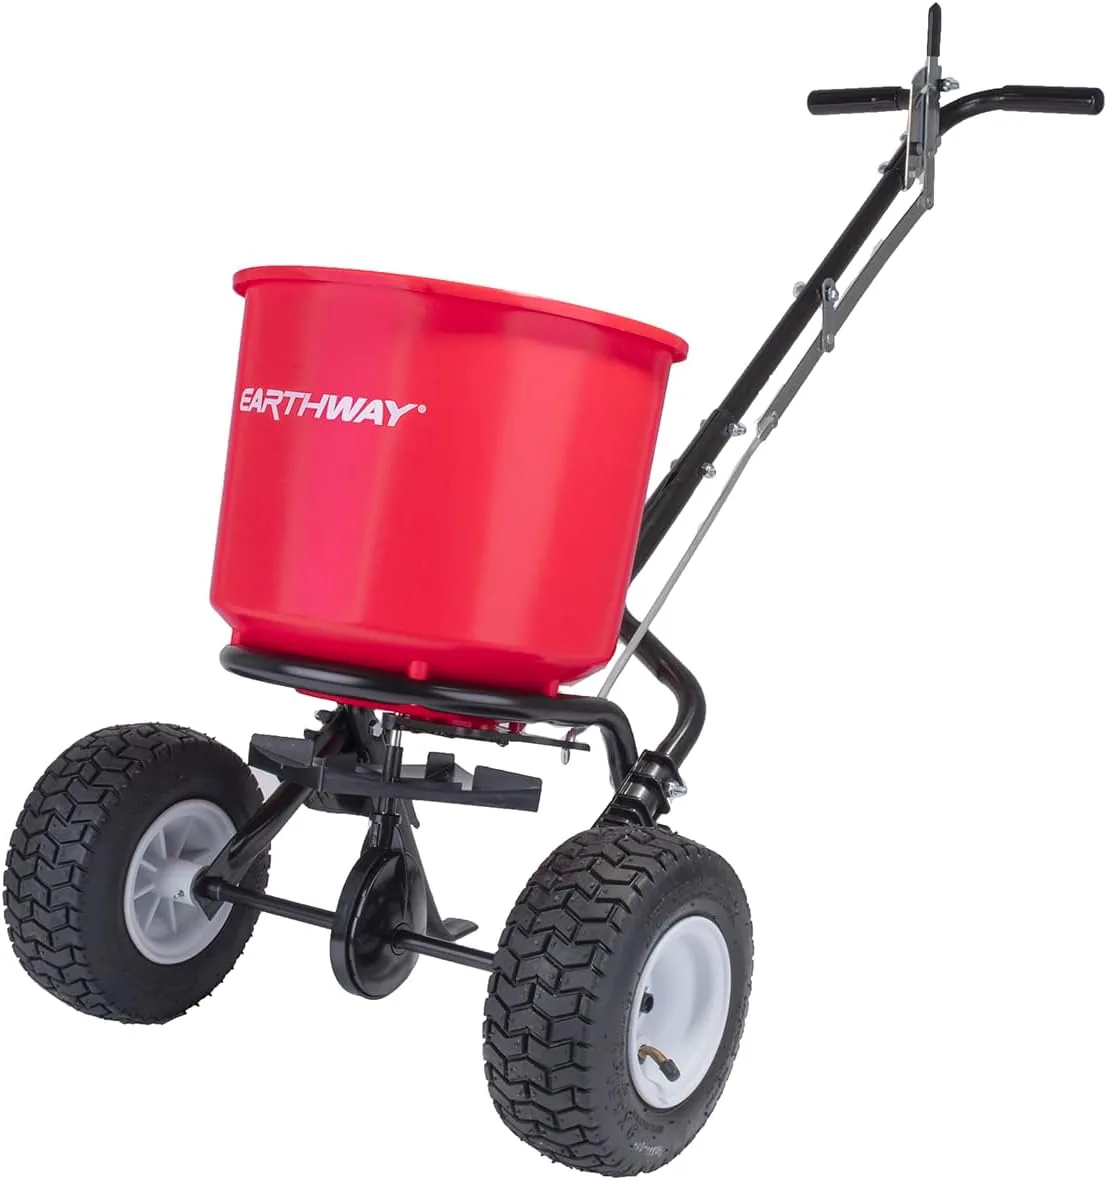
5. EarthWay 2600A-Plus 40 lb Estate Push Broadcast Spreader Best for Rock Salt
EarthWay’s manual puts rock salt and the gearbox together in two places. The EarthWay 2600A-Plus is the one rock salt spreader here with a printed step for it: take the agitator out first, to prevent gearbox damage. That makes it my pick for a driveway job where rock salt is the product, with the limits the maker prints beside it.
WHY I CHOSE THIS ✓
I gave it the rock salt label because its manual is the one that tells you how to run it on rock salt. The honest limits sit beside it: powdered materials are out, and the warranty excludes corrosion damage from fertilizers and ice melt products. I pick it for owners who already know their product.
EarthWay 2600A-Plus 40 lb Estate Push Broadcast Spreader Specs
Key Features:
- Rock salt step in the manual: EarthWay says to remove the agitator when using rock salt to prevent gearbox damage, a warning it prints twice.
- Powdered materials ruled out: the manual says not to use them because they will damage the gearbox, a limit worth knowing before you buy a bag.
- Sealed gearbox: the gears are lubricated at the factory and EarthWay says not to open the gearbox, or dirt may enter.
- Side Spread Control: a lever under the right side of the hopper that EarthWay says shuts off left-side spreading. What it does on your path is your result.
- Finish-of-job care: empty the hopper, rinse the spreader and coat all metal parts with light oil, as the current manual says.
The controls are plain. A lever on the T-handle pulls back to a stop bolt on a numbered gauge, and EarthWay says to push it forward to close the flow holes before you stop moving. The manual also warns that wet product changes the spread pattern and the flow rate. Removing the agitator puts a hand into the hopper, so complete the stop and make-safe steps in the safety section below first.
The gearbox is the reason for the rock salt rule. Complete the safe-state steps before any hands-on step. I assembled the unit in sixteen steps, with pliers to bend the wheel pins, and the gearbox arrow has to point to the front so that the impeller turns clockwise when you push forward. It is sealed, so the maintenance is outside: rinse, dry and oil the metal parts.
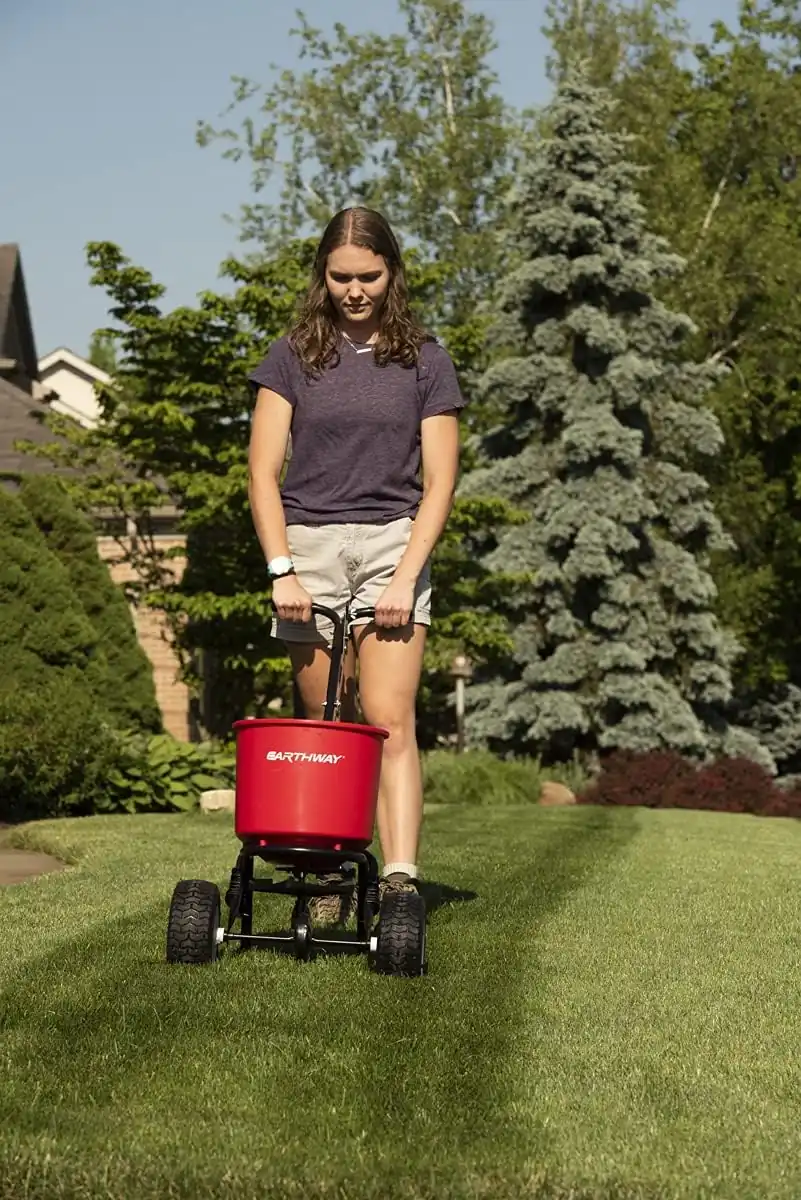
Check the gearbox arrow against the front of the spreader before you tighten anything, since reversing it causes problems the manual warns about.
EarthWay’s warranty excludes corrosion damage from fertilizers and ice melt products, so a rinse and a coat of light oil matter.
After every winter job, rinse and oil the metal parts as the current manual says, once the safe-state steps are done. The 9 in wheels rolled across the gravel yard, and the gauge sits where I can read it from behind the handle. EarthWay sells a rain cover separately. I cover the 40 lb push model in my EarthWay 2600A-Plus residential spreader review.
Pick it when rock salt is your product and you want a maker-written agitator step for it. Skip it if you spread powdered products, or if you want a warranty that covers corrosion from ice melt.
FINAL VERDICT
The EarthWay 2600A-Plus is the rock salt choice, with one clear step and clear limits. Buy it for that job, and keep the label of your product beside the manual.
It is the push spreader for owners who spread rock salt.
6. Brinly HHS3-5BH 5 lb Handheld Crank Spreader Best Small
Some winter jobs are a porch, three steps and a front walk, and a big spreader is the wrong size for all of them. The Brinly HHS3-5BH is the small ice melt spreader on this page: a 5 lb hopper, a trigger handle in one hand and a long crank in the other. Brinly lists ice melt among the things it spreads, and its maker FAQ says all its spreaders can dispense it.

WHY I CHOSE THIS ✓
I chose it because the job it fits is small and common. The hopper is printed at 5 lb, the smallest on this page, and Brinly lists ice melt among its uses. For steps and walks, the size is right.
Brinly HHS3-5BH 5 lb Handheld Crank Spreader Specs
Key Features:
- Ice melt on the maker’s list: Brinly names ice melt, fertilizer and grass seed on the product page. Your product’s label decides whether your material goes through it.
- Smallest hopper here: 5 lb or half a gallon, as Brinly prints it, a size for steps, a porch and a short walk.
- Trigger handle and long crank: one hand holds the grip and the trigger, the other turns the crank at the side of the housing.
- Knob-adjusted flow gate: a knob at the front of the hopper changes the gate opening, within reach of your thumb.
- Contoured fill lip: the maker says the reinforced lip makes filling quick.
The grip sits under one hand and the crank handle under the other, and the knob at the front changes the gate. I held it at waist height with an empty hopper and turned the crank until the motion felt natural. Check the knob before every job; the page prints no scale for it. The stop and make-safe steps in the safety section below come before any filling or hands-on step.
The 5 ft figure is Brinly’s ceiling for a product it does not name, so I treat it as a maker’s upper limit and not as a result. The listing gives 1.59 lb. In the hand, the spreader felt light enough to forget until the hopper held product. A small hopper means frequent refills, so plan the job around the hopper and the fill limit your product label gives. My Scotts Whirl vs Brinly handheld spreader comparison puts its printed figures beside a Scotts crank model.

Fill with the unit set down on a hard surface and pour from the contoured lip.
Brinly lists ice melt for this model. Before you load any salt product, confirm with Brinly that it suits this model and check the product label.
The unit has few parts: a hopper, a gate knob, a crank housing with enclosed gears. Clean it only by a method that both the product label and the maker’s instructions permit, after the safe-state steps. The capacity is the limit I noticed: a long walk needs several refills, and each one is another stop.
Reach for it if your ice melt jobs are steps, a porch and a front walk, and you want something small to store. Skip it if you clear a driveway, where the refills add up.
FINAL VERDICT
The Brinly HHS3-5BH is the small-job spreader on the page. It does steps and short walks, and nothing larger. Use it with the label of your product in hand.
It is the small handheld for steps and the front walk.
7. WORX WG869 20V Cordless Handheld Broadcast Spreader Kit Best Electric
A trigger and a speed dial do the work that a crank does on the other handhelds, and that makes the WORX WG869 the only electric ice melt spreader on this page. The box holds the spreader, a 2.0 Ah battery and a charger. WORX’s manual says it is intended for rock salt or de-icer outdoors, and it prints a temperature range for use that winter jobs must respect.

WHY I CHOSE THIS ✓
I put the WG869 last for ice melt because a battery tool and a freezing walk do not always meet inside the range the maker prints. It still earns a place: a complete kit and a manual that names rock salt and de-icer.
WORX WG869 20V Cordless Handheld Broadcast Spreader Kit Specs
Key Features:
- Rock salt and de-icer in the intended use: the manual names both. Your product’s label still decides.
- Battery and charger in the box: the manual says the battery needs a full charge before first use.
- Edge-control deflector: the manual sets the spreading width with the speed dial and the deflector together.
- Printed use range: the manual gives 32 °F to 113 °F for use and storage of the tool and battery.
- Light in the hand: 2.27 lb for the bare tool in the manual, about 3.1 lb with the battery per the maker.
The trigger starts the spinner and the dial sets its speed. I held the empty tool by the loop handle and found the trigger under my forefinger and the dial within reach of my thumb. WORX’s manual says to walk at a normal pace while spreading. It asks for safety glasses and a face or dust mask for dusty work, and recommends rubber gloves and substantial footwear. Complete the safe-state steps in the safety section below, including the battery steps, before any filling, cleaning or battery change.
Winter use is where this tool is weakest. The manual gives 32 °F to 113 °F as the ambient range for use and storage of the tool and battery, and says not to use the product in rain or in damp or wet locations. For a snowy walk, WORX says to wear suitable snow boots and walk carefully and slowly. I turned the deflector by hand and it moved freely, and I weighed the tool in my palm with and without the pack.

Keep the battery clean and dry, as the manual says.
Use only the charger the manual specifies, and do not use a damaged or modified battery.
The manual’s cleaning line is short: wipe clean with a dry cloth, after the safe-state steps, and store the tool dry and out of children’s reach. The weather limit gave me pause: I read the range twice before I decided where the tool belongs, and the answer was a mild day and a small area.
It fits you if your ice melt job is small and mild and you want a trigger in place of a crank. Skip it if your winters run below the printed range or you work in rain or wet snow.
FINAL VERDICT
The WORX WG869 is the electric choice for small, mild-weather melt jobs. Read the temperature range before you buy.
It is the electric spreader for small mild-weather jobs.
How to Choose the Best Spreader for Ice Melt
Ice melt changes what you ask of a spreader. The hopper must be allowed to hold it, the metal must survive it and your footing must hold while you work. These six factors come from the manuals and from handling the spreaders on this page.
What the Manual Says About Salt and Ice Melt
Read the materials line before the spec table. A rock salt spreader earns the name only if its manual allows rock salt, and a manual that forbids rock salt or powdered product rules itself out of that job, whatever the listing says. I read this line first because the product label and the spreader manual both have to agree.
- Ice melt or salt named: the manual or the maker’s page lists it among the materials.
- A step for rock salt: a printed instruction, such as taking a part out of the hopper first.
- A cleaning order for winter use: what to remove, how to clean and dry, and what to oil.
- Limits in writing: forbidden powders, forbidden rock salt or a warning about damp product.
If the product’s instructions and the spreader’s instructions cannot both be followed, do not use that combination, and ask the manufacturers for guidance. K-State Research and Extension warns that salt can damage metal and concrete surfaces, which is why the cleaning line matters as much as the materials line.
Handheld, Push, Battery or Tow-Behind Spreaders
Four forms cover home winter jobs, and the form decides the job. A handheld ice melt spreader suits steps and a porch. A walk-behind unit suits a driveway, and a tow-behind unit suits a lane too long to walk. Battery models swap the crank for a trigger, so check the temperature range in the manual of any electric ice melt spreader. My list of handheld spreaders for small jobs covers the crank and battery models.
| Form | Suits | Trade-off |
|---|---|---|
| Handheld crank | Steps, porch, short walk | Small hopper, arm work |
| Battery handheld | The same jobs without the crank | Battery and temperature limits in the manual |
| Push (walk-behind) | Driveway, long walk | Assembly, rinse and dry |
| Tow-behind | Long lane or lot | Needs a towing vehicle and its manual |
University of Kentucky Extension says rotary spreaders spread a wider swath and suit large areas (1). How you carry a hand-crank spreader matters too, because a 1979 study found the pattern changed with the carrying position (2). I held each handheld at waist height before I judged how it carries. In my “best spreader for large lawn” roundup, I compare seven push and tow-behind models by hopper size.
Hopper Size and the Pavement You Clear
Hopper capacity is a ceiling the maker prints, and it says nothing about coverage. The product label and the manual say how much to fill and how much to apply. I match the hopper to the longest run I clear in one load, because every refill is another pass through the safety steps.
- Steps and a porch: a handheld with a small hopper is enough and easy to store.
- A front walk or a short drive: a chest-mount unit or a small push spreader.
- A long driveway: a push salt spreader with a large hopper saves trips to the bag.
- A lane or a lot: a tow-behind unit, with the vehicle’s manual setting the limits.
Gate, Stop and Controls
The gate is the control you use most on any ice melt broadcast spreader, so I keep it under my hand and practice opening and closing it on the empty machine until I stop thinking about it. NC State Extension says to close the lever before slowing, turning or stopping and never to spread while turning, because one wheel usually drives the impeller (3). My best broadcast spreader list covers nine push, tow-behind and handheld models.
- A lever with a stop: a limit on how far the gate opens.
- A gate you can see close: you can tell it is shut without bending.
- Screen or agitator instructions: where the manual says to remove one, learn the order before the first fill.
Pro Tip
Walk the route once with the hopper empty and the gate closed, and decide every turning point before product goes in.
Keep the frame level as well. A test of tractor-mounted agricultural rotary spreaders found that tilting them changed the pattern significantly, and its authors say rotary spreaders should be level (4). My best spreader for uneven ground list compares nine push, tow and hand models.
Cleaning, Corrosion and Storage
Winter work ends at the work pad, and this is where manuals differ most: one says rinse and dry, another says soap and water, another says wipe with a dry cloth, and some print a corrosion warning for ice melt. Follow the one in your box. NC State Extension says to wash a spreader after use, dry it completely, lubricate it as the owner’s manual specifies and store it empty in a cool, dry place (3).
| Question | What to look for |
|---|---|
| Rinse or wipe? | The maker’s own method; rinse only where it permits |
| Drying | Dry completely before storing |
| Lubrication | Where the manual points; some gearboxes are sealed |
| Corrosion | A warning for ice melt, or a warranty exclusion |
Cleaning Rule
Before you clean, complete the stop and make-safe steps in the safe-state box in the safety section below. I check how a manual tells you to clean before I check anything else about upkeep.
Weather, Damp Product and Footing
Ice melt jobs happen in the worst conditions for a spreader. Some manuals forbid use in rain or damp places, some print a temperature range, and some say not to use the spreader on windy days. A battery tool needs the extra check, because its battery and charger have ranges of their own. A laboratory study of rotary spreaders found that fertilizer taking up moisture changes its friction on the impeller and skews the pattern (5). The study tested fertilizer in humid air, so apply it to fertilizer only and follow your own manual and label for any other product.
Footing
A manual that asks for closed-toe shoes with good traction and tells you to walk, not run, on slippery ground is writing for this job. I choose a spreader whose weight I can carry on ice.
Safety When Spreading Ice Melt
Read the product label before you open the bag. Follow its directions for the permitted use, the application amount, protective equipment, weather, watering in, access by people and pets, storage and disposal. Using a registered pesticide in a way its label does not allow is against federal law. Follow the spreader’s manual too. If the product’s instructions and the spreader’s instructions cannot both be followed, do not use that combination; ask the manufacturers for guidance.
The Safe-State Box
Emergency first, for a spreader with a battery: if a battery becomes unusually hot, swells, hisses, gives off an unusual odor or smokes, stop using the spreader without handling or removing the battery, keep people away and follow the battery manual’s emergency instructions; if it smokes, burns or presents immediate danger, move away and call 911 or the fire department without finishing the routine steps. Stop and make safe before you fill or unload the hopper, reach into the hopper, clear a clog, clean or rinse the spreader, lubricate it, adjust the gate or the pattern, change a part, hitch or unhitch it, charge or change a battery, move it, store it or leave it. Keep your hands, feet, hair and loose clothing away from the impeller, the plate, the agitator, the gears and the wheels while anything can turn. During normal spreading, walk or drive only as your manual and the product label permit; walking behind a push spreader, or pulling a tow-behind unit at the speed its manual describes, is operation, not transport. Walk-behind or hand-crank spreader: close the gate, then stop walking or cranking, and wait until the impeller, plate, agitator and wheels have stopped turning. Tow-behind spreader: close the gate, stop the vehicle, set the parking brake, switch the engine off and remove the key as the vehicle’s manual says, and wait until the wheels, impeller and agitator have stopped turning, before you reach into the hopper or touch the impeller. Battery spreader: release the trigger or close the gate as your manual directs, switch the spreader off, wait until all moving parts have stopped, then remove the battery as the manual directs (on a model with a built-in battery that cannot be removed, such as the WORKPRO X, follow that manual’s own off and storage steps instead, and never open the battery compartment) and keep a removed battery away from the spreader while you work. Follow any additional isolation steps in the exact manual. Keep the gate closed while you fill. Wear all the protective equipment the product label and your manual require while you fill, clean or clear a jam. Clear a clog only with the method in your exact manual. Follow every applicable safety step in your manual, in the order it specifies. Refit every guard and cover, and check that the gate opens and closes before product goes back in.
Protective Equipment
Protective Equipment
Wear all the protective equipment the product label and your spreader’s manual require, and put it on before you open the bag. Wear it every time you fill the hopper, clean the spreader or clear a clog. Protective equipment lowers your exposure; it does not make handling a lawn product safe.
Wash your hands before eating, drinking, smoking or using the restroom when you work with pesticides. Change your clothes and wash your hands immediately after you apply a product that contains a pesticide, and follow the label’s additional washing and clothing instructions.
Settings, Filling and Spills
The product label gives the application directions, so read it before you set the gate. A setting listed for your exact spreader and product is a starting point, not proof of the amount delivered: follow the spreader’s manual and calibrate for the product, the spreader and the person using it before you apply. Never exceed the label’s application rate.
Before you fill or unload the hopper, complete the stop and make-safe steps for your spreader in the safe-state box, and keep the gate closed. For fertilizer, fill on a hard surface where spilled granules can be swept up, away from drains and water. Follow the product label’s handling and ventilation directions, and wear all the protective equipment the label and your manual require. Fill only to the level your manual allows, and secure the hopper cover or lid if your spreader has one. Keep children and pets away, and never leave a filled spreader where they can reach it.
Keep people and pets away from a spill. Follow the product label and its safety data sheet for collecting, reusing and disposing of spilled product, and wear the protective equipment they require. Never hose or wash granules into a street, a gutter, a drain, a ditch or water, and do not pile spilled product onto the lawn or return contaminated material to the bag. If you cannot manage the spill safely, stay away and call the emergency number on the label. Call Poison Control at 1-800-222-1222 if anyone is exposed, and call 911 for a fire or immediate danger.
Runoff, Gate Discipline and Clogs
Keep fertilizer off pavement and out of drains and surface water. If scattered plain fertilizer lands on a sidewalk, a driveway or a patio, sweep it back onto the lawn before you water, without going over the label rate; collect a concentrated spill instead. For pesticide granules, follow the label’s cleanup instructions. Follow any buffer requirement that applies and keep fertilizer out of those areas. EPA advises against fertilizing before windy or rainy days, and Purdue advises against fertilizing drought-stressed, dormant or frozen turf (6). Follow the product’s weather and watering directions too.
Close the gate before you stop, before you slow down to turn, and whenever you pause, and open it again only after you are walking or driving at the steady pace your manual describes. Do not spread while you turn.
Never push, kick or dig product out of the gate or off the plate while anything can turn. If product clumps or bridges in the hopper or the gate clogs, stop and complete the stop and make-safe steps in the safe-state box first, then clear it only with the method in your manual.
Tow-Behind and Battery Spreaders
Follow your towing vehicle’s owner’s manual and the spreader’s own manual for hitching, turning, slopes, speed and load limits, and stay within the tow capacity in the vehicle’s owner’s manual. Never ride on a spreader or carry a passenger on it. Turn only as the two manuals direct, and keep children and pets well clear of the vehicle and the spreader while you load, hitch and spread. Before you fill, hitch, unhitch, reach into the hopper or touch the impeller, complete the tow-behind steps in the safe-state box.
Use only the batteries the maker specifies for your exact spreader, and charge, store and handle them only as your manual describes. Recharge rechargeable batteries only with a charger the manual approves, and never recharge disposable cells. Before you fill the hopper, clear a jam, clean the spreader or change the battery, follow the emergency exception and the applicable stop and make-safe steps in the safe-state box.
Lithium-ion batteries can overheat and catch fire (thermal runaway), so do not use a damaged battery or charger. If a battery becomes unusually hot, swells, hisses, gives off an unusual odor or smokes, stop using it without handling or removing it, keep people away and follow the battery manual’s emergency instructions; if it smokes or burns, move away and call 911 or the fire department.
Ice Melt, Children, Cleaning and Storage
Use ice melt or salt only when both the product’s directions and your spreader’s manual permit it. Salt-based deicers can damage metal, so follow your model’s cleaning instructions after use. Before you clean the spreader, complete the stop and make-safe steps in the safe-state box. Rinse only if the manual permits it, and dry the spreader as the manual directs. Do not use lawn fertilizer to melt ice. Keep deicing products away from children and pets.
Keep children, pets and other people away from the area while you fill and spread, and keep them off the treated area for as long as the label says. Store the bag and the filled spreader where they cannot reach them.
Before you clean the spreader, complete the stop and make-safe steps in the safe-state box, and wear the protective equipment the product label and your manual require. Handle leftover product, cleaning water and residues as the product label directs. Clean the spreader only by a method both the label and the manual permit, and rinse it only where they permit it, keeping product and contaminated wash water out of drains and water supplies. Dry the spreader completely, and lubricate it as its manual directs. If you change products, follow both products’ cleaning requirements: a rinse alone does not show that all residue is gone.
Before you store the spreader, complete the stop and make-safe steps in the safe-state box. Store it empty, clean and dry, as your manual describes, with the gate closed. Keep products in their original labeled containers, securely closed, under the storage conditions their labels give, and away from children and pets. Lock pesticides away, apart from fertilizer, food and animal feed, and never put any product into a food or drink container. Store a battery as the battery manual describes.
If Someone Is Exposed
If someone swallows or is exposed to a lawn product, follow the first-aid section of the product label and call Poison Control at 1-800-222-1222, and keep the product label with you. Call 911 in an emergency.
My Overall Verdict
I ranked these seven on what a winter driveway asks of a spreader: a hopper the maker’s manual lets you load with ice melt, a gate I can work in gloves and a cleaning order I can follow.
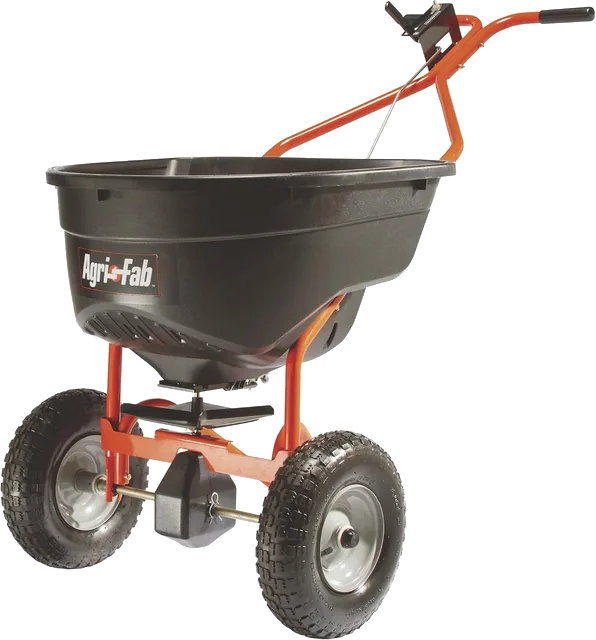
1. Agri-Fab 45-0462 Push Broadcast Spreader Best Overall
For a long driveway or path, where a 130 lb printed hopper and the maker’s ice melter chart row save trips.

2. Brinly P20-500BHDF-A 50 lb Push Spreader with Side Deflector Kit Best Premium
For a driveway beside planting, with a deflector in the box and a written ice melt routine.

3. SOLO 421 20 lb Chest-Mount Crank Spreader Best Value
For steps, a porch and a short drive, carried on one shoulder at a mid-range price.
The four below them each earn a place on one printed fact: a tow-behind hitch, a rock salt step, the smallest hopper and a battery in the box. Match that fact to your job, then read the label and the manual.
Pick the best spreader for ice melt by the pavement you clear and the product you load, and keep the label and the manual in your hand while you decide. For lawn work, my list of lawn spreaders compared covers push and handheld picks.
Why Agri-Fab 45-0462 Push Broadcast Spreader Might Be the Best Choice
The 45-0462 earns its place because winter pavement is usually long, and the hopper sets the pace. Agri-Fab prints 130 lb, the largest of the push models here, and its manual chart lists an ice melter row. I cover the 45-0462 in full in my Agri-Fab 45-0462 push spreader review.
The trade-off is thin safety wording in the manual, so I lean on the steps in the safety section above and on the label of the product I load. Assembly also takes a hammer and two wrenches.
Five reasons stand behind my pick:
✓ Largest push hopper: 130 lb as Agri-Fab’s description prints it.
✓ Ice melter chart row: named in the application chart.
✓ Big pneumatic tires: 13 in x 4 in, as the listing prints them.
✓ Control in reach: lever, numbered gauge and stop under the grips.
✓ Three-year household warranty: wheels and bearings excluded in years two and three.
Frequently Asked Questions
What is the best spreader for ice melt?
The best spreader for ice melt on this page is the Agri-Fab 45-0462, a 130 lb push broadcast model whose manual chart lists ice melter. Your best pick depends on the pavement: a handheld suits steps, a push spreader a driveway and a tow-behind unit a long lane, with the label and manual deciding.
Can you put ice melt in a spreader?
You can put ice melt in a spreader only when both the ice melt’s directions and the spreader’s manual permit it. The manuals on this page print different materials lines and different cleaning steps, so read yours carefully before the first fill and follow its rinse and dry directions afterward.
What are the different types of ice melt spreaders?
Ice melt spreaders come as handheld crank or battery models, walk-behind push models and tow-behind models. Each has a gate over a spinning plate, and the manual of your exact model says which materials the hopper may hold, so read it before you choose a type for your pavement this winter.
What are the features of ice melt spreaders?
The features that matter in an ice melt spreader are a gate with a stop, a hopper size that fits your pavement and a manual that names ice melt or salt. Check for the cleaning steps the maker prints and for a screen or agitator the manual tells you to remove.
What is the capacity of ice melt spreaders?
Hopper capacity on the spreaders here runs from 5 lb on the smallest handheld to 130 lb on the largest push and tow-behind models, as the makers print it. That figure says how much the hopper holds and nothing about coverage, so match it to your longest run and let the product label set the amount.
References
- Munshaw G. Calibrating Fertilizer Spreaders for the Home Lawn. AGR-211. University of Kentucky Cooperative Extension Service; 2014.
- Wolf DD, Smith ES. Uniformity of seed and fertilizer distribution with a hand-operated spinning spreader. Trans ASAE. 1979;22(4):761-762.
- Miller G, Kerns JP, Billeisen T. Organic Lawn Care: Composting and Spreaders. AG-562. NC State Extension; 2026.
- Yildirim Y. Effect of side to side spreader angle on pattern uniformity in single- and twin-disc rotary fertilizer spreaders. Appl Eng Agric. 2008;24(2):173-179.
- Parish RL. The effect of relative humidity on rotary turf spreader patterns. Appl Eng Agric. 1991;7(5):541-544.
- Bigelow CA, Tudor WT, Nemitz JR. Facts About Phosphorus and Lawns. AY-334. Purdue University Extension.
Safety Note: Read the product label and your spreader’s manual before handling product. Follow both; if their instructions cannot both be met, do not use that combination. Registered pesticide use must comply with its labeling. A listed spreader setting is a starting point; calibrate as the manual directs and never exceed the label rate. Wear all protective equipment required by the label and manual before opening the container and during filling, cleanup and jam clearing. Wash your hands before eating, drinking, smoking or using the restroom when working with pesticides. After application, change your clothes and wash your hands immediately, and follow the label’s additional washing and clothing instructions. Keep children, pets and other people away during handling and application and off treated areas for as long as the label requires. Emergency first: if a battery becomes unusually hot, swells, hisses, smells unusual or smokes, stop using the spreader without handling or removing the battery. Keep people away and follow the battery manual’s emergency instructions. If it smokes, burns or presents immediate danger, move away and call 911 or the fire department. Otherwise, complete the applicable stop and make-safe sequence before filling, unloading, reaching into the hopper, clearing a jam, cleaning, lubricating, adjusting, changing parts or batteries, hitching, unhitching, transporting, storing or leaving the spreader. Walk-behind or hand-crank: close the gate, stop walking or cranking, and wait for all moving parts to stop. Tow-behind: close the gate, stop the vehicle, set the parking brake, switch off the engine and remove the key as the vehicle manual directs, and wait for the wheels, impeller and agitator to stop before reaching into the hopper or touching the impeller. Battery spreader: release the trigger or close the gate, switch off, wait for moving parts to stop, then remove the battery as the manual directs and keep it away while working. Follow any additional isolation steps in the exact manual. Keep hands, feet, hair and loose clothing away from moving parts. Clear jams only by the manual’s method. Refit guards and covers and check the gate before refilling. With the spreader made safe and the gate closed, fill fertilizer on a hard surface where spills can be collected, away from drains and water. Follow the label’s handling and ventilation directions and the manual’s fill limit. Keep people and pets away from spills. Follow the label and safety data sheet for collection, reuse and disposal; do not spread concentrated spills onto the lawn or return contaminated product to its bag. Sweep scattered plain fertilizer from pavement onto the intended lawn before watering only without exceeding the label rate. Follow the label’s cleanup instructions for pesticide granules. Never wash product into streets, gutters, drains, ditches or water. Observe applicable buffers. EPA advises against fertilizing before windy or rainy days; Purdue advises against fertilizing drought-stressed, dormant or frozen turf. Close the gate before stopping or turning, as the manual directs. Follow both towing manuals for hitching, turning, slopes, speed and load limits; never ride on the spreader or carry passengers on it. Use only batteries specified for the model. Recharge rechargeable batteries only with a charger approved for them, as the manual directs; never recharge disposable cells. After completing the applicable shutdown, handle leftover product, cleaning water and residues according to the product label. Clean only by methods permitted by both label and manual, keeping contaminated water out of drains and water supplies. Rinse only if permitted, then dry and lubricate as directed. A rinse does not establish that all pesticide residue is gone. Use salt or ice melt only when the product directions and spreader manual permit it. Salt-based deicers can damage metal; follow the model’s cleaning instructions. Do not use lawn fertilizer to melt ice. Store the spreader empty, clean and dry as its manual directs. Keep products securely closed in their original labeled containers under their labels’ storage conditions, away from children and pets. Lock pesticides away, separate from fertilizer, food and feed; never use food or drink containers. For human exposure, follow the label’s first-aid instructions, call Poison Control at 1-800-222-1222 and keep the label available. Call 911 for immediate danger.