
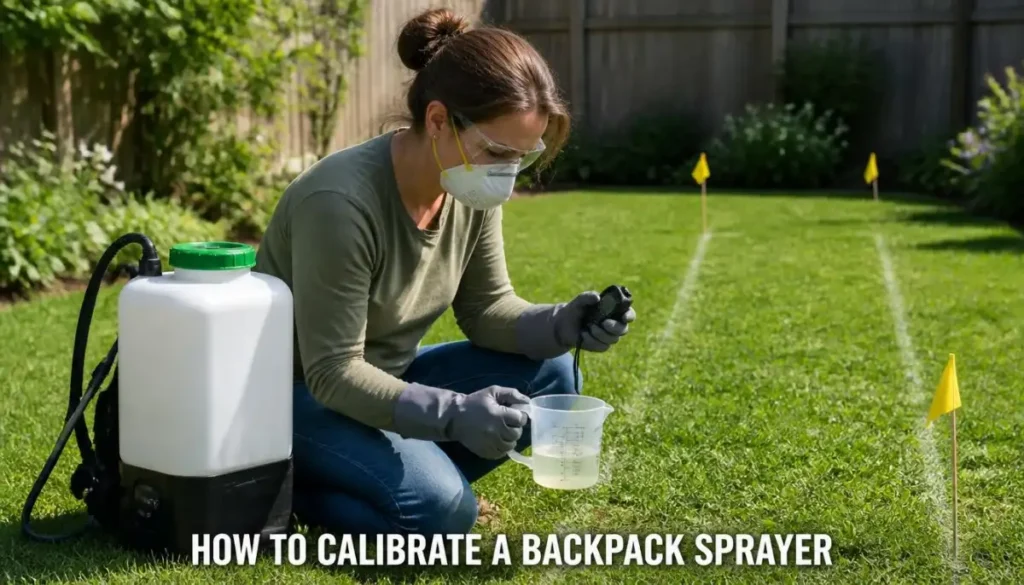
Learning how to calibrate a backpack sprayer takes one marked square, a stopwatch and a measuring cup. You spray clean water over 340 square feet while you time yourself, collect what the nozzle puts out in that same time, and read the ounces as gallons per acre for your own nozzle, pressure and pace. My plant protection training taught me to trust a measurement over a spec sheet, so I tell anyone with a new sprayer to measure first. Below are the five steps, the arithmetic, the fixes when the number is off and the safety order.
How to Calibrate a Backpack Sprayer in Five Steps
The University of Kentucky’s no-math method needs only water, a tape measure, a container marked in fluid ounces and a watch (1). The five steps are fill and practice, lay out the square, time the walk, collect the output and read the result. Every step before the last one puts your hands near the tank, the nozzle or the battery, so the full shutdown in the box below comes first.
Full Shutdown Before You Open the Tank
Emergency first: if a battery becomes unusually hot, swells, hisses, gives off an unusual odor or smokes, stop using the sprayer without handling or removing the battery, keep people away and follow the battery manual’s emergency instructions; if it smokes, burns or presents immediate danger, move away and call 911 or the fire department without finishing the routine shutdown. Shutdown before you open the tank, fill or refill it, change or clean a nozzle, clear a clogged nozzle, clean or rinse the sprayer, adjust or repair anything, charge or change the battery, move, store or leave the sprayer. Never point the wand at yourself, another person or a pet. During normal spraying, move only as the equipment manuals and the product label permit; walking while spraying with a backpack unit, or driving a mounted boom at the spraying speed its manual describes, is operation, not transport. Never ride while operating a hand-held wand or lance. Battery sprayer (handheld or backpack): release the trigger or close the wand valve, then switch the pump off. Relieve all trapped pressure using only your exact manual’s procedure and a discharge destination consistent with the product label, without opening the tank or loosening any part beforehand unless that procedure expressly requires it, and never toward yourself, another person or an animal. Then remove the battery and keep it away from the sprayer. Wear the protective equipment the product label requires while you clean the tank, the strainer or a nozzle. Clear a clogged nozzle only with the method in your exact manual; never clear a nozzle with your mouth and never by blowing into it. Add every step your manual gives, in its order. Refit every part, close the lid and check for leaks with clean water before product goes back in.
A hand-pump backpack sprayer has no battery and no pump switch. For that sprayer, release the trigger, relieve the pressure only as its manual describes, and follow the rest of the box in the same order.
- Complete the full shutdown in the box above, then fill the tank with clean water to about half full and close the lid as your manual directs. Install the battery only when you are ready to run the sprayer.
- Practice with water on pavement or gravel at the nozzle setting you will use: steady pump or steady trigger, steady pace, wand at the same height on every sweep.
- Measure your swath width, divide 340 square feet by that width to get the length of a 340 square foot test area, and mark the corners with flags or cones.
- Spray the square at your practice pace and time it. Then spray into a measuring container for that same number of seconds, with the wand pointing down at the container and away from your feet and from anyone nearby. Repeat to confirm the result.
- Read the ounces in the container. For the sprayer, nozzle, pressure and pace you just used, the ounces collected equal gallons per acre.
That result describes your sprayer, not any product. I recommend doing the whole sequence on clean water, once, before any product goes near the tank.
What Calibration Measures and What It Does Not
Calibration measures how much liquid your sprayer puts on an acre when you use one nozzle at one pressure and one walking pace. It never measures how much product to add. That amount comes from the label, and the label also sets the spray volume your product expects.
Calibration in One Paragraph
Calibrate with clean water, not the product, whenever you can. The University of Kentucky’s no-math method sprays a measured area of 340 square feet (a square 18.5 feet on a side) with water while you time it, then collects the water from the nozzle for the same time; the ounces collected equal the gallons per acre that sprayer puts out with that nozzle, that pressure and that walking speed. That figure is the sprayer’s own output. It is not a product rate, which comes from the label. Calibrate again when the nozzle, the pressure or the product changes.
The Label Owns the Amount
The product label, not this page, gives the amount of product, the dilution and the mixing order, so read it before you mix. Do not combine products unless the mixture complies with every product’s label and its compatibility has been established through the manufacturers or a qualified pesticide specialist; nobody’s advice overrides a label prohibition.
Why Pace Counts as a Setting
NDSU Extension says the amount applied per acre depends on forward speed, system pressure and nozzle size (2). A backpack has no speedometer, so your pace is the setting you cannot read off a dial. NC State Extension gives a way to check it: 100 feet walked in 68 seconds is 1.0 mile per hour, and it says not to change your speed to adjust output.
I pick a pace I can hold for a whole orchard row, because a pace I cannot keep is the first thing that ruins the number. The practice walk in step two exists to find that pace before the clock starts. My picks of battery sprayers for fruit trees are backpack models sized for home orchards.
Why the Record Names the Nozzle and Pressure
A result without its nozzle and pressure is only a number. Write down the nozzle, the pressure setting if the sprayer has one, the seconds for the square and the ounces collected. I think that small note saves the most time later, when you swap a nozzle and need to know what changed.
Check the Sprayer Before You Calibrate
A leak, a plugged strainer or a worn nozzle turns the measurement into a measurement of the fault. NC State Extension says to start with the pump, control wand, strainers, pressure gauge, pressure regulator and hoses, looking for obstructions and leaks and checking the gauge for accuracy. Complete the full shutdown in the box in the first section before any of this.
First Water Test and Pre-Use Check
Before the first water test, complete the full shutdown in the shutdown box, then fill the tank with clean water and close the lid as your manual directs. Connect the power (install the battery) only when you are ready to test. Run the sprayer and watch the wand, hose, fittings and tank seams for leaks without touching pressurized parts. Before you open the tank, correct a leak or add product, complete the full shutdown again. Before every use, check the tank, strainer, hose and nozzle, and fix any leak before product goes in. Follow your manual’s first-use steps.
Read the Nozzle Before You Spray
NC State Extension says to compare a nozzle’s discharge with the maker’s table and to replace a nozzle with a bad pattern or a discharge more than 10 percent above or below the recommended rate. NDSU adds that new nozzles wear and their flow rate can rise quickly, so a sprayer should be recalibrated after a few hours of use (2). In plant protection training the lesson that stuck with me was that a worn nozzle can spray more, which is why the number drifts up over a season. Before you remove or replace a nozzle, complete the full shutdown in the shutdown box.
Pressure and Nozzle
A sprayer’s maximum pressure is the limit of the machine, not a setting to aim for. The product label and the nozzle’s maker decide the pressure and the nozzle for a job. Higher pressure makes more fine droplets that drift, and the nozzle you choose changes the droplet size.
Battery and Charger
A battery backpack adds one more check: the battery and the charger. Anyone who plans to calibrate backpack sprayers on a schedule should do that check first. My battery backpack sprayer vs manual backpack sprayer guide shows what changes on your back.
Battery and Charger
Use only the battery and charger the maker supplies or lists for your exact sprayer, and charge, store and handle the battery only as your manual describes. To change or charge a battery, first complete the full shutdown in the shutdown box, including its emergency exception, which ends with removing the battery; begin the change or the charging only after that. Lithium-ion batteries can overheat and catch fire (thermal runaway), so do not use a damaged battery or charger, and follow the manual’s directions if a battery or charger gets wet. If a battery becomes unusually hot, swells, hisses, gives off an unusual odor or smokes, stop using it without handling or removing it, keep people away and follow the battery manual’s emergency instructions; if it smokes or burns, move away and call 911 or the fire department.
Practice the Pattern and Lay Out the Square
The practice walk decides whether your result is worth anything. Penn State Extension tells you to practice with water on an even surface such as pavement or gravel, where droplets show, or to use colored water on low vegetation. Before you set or change the nozzle, complete the full shutdown in the shutdown box, including its emergency exception. Penn State’s method uses an adjustable cone nozzle set to a mid-range setting that gives a somewhat solid cone. If your sprayer has a different nozzle, use the nozzle and setting your manual and label allow and calibrate that exact setup. Pump steadily, walk steadily and keep the wand at a consistent height.
Release the trigger at the end of each sweep, or the edges get heavier coverage. Aim for light, even coverage where you can still see individual droplets, with no skips. My choice for the practice square is the concrete work pad in front of the machinery shed, because droplets show on it and a hose clears it afterward.
Find Your Swath and Size the Test Area
Spray one swath several times so it stays visible, then measure its width. Divide 340 square feet by that width to get the length of the test area, which is a rectangle unless your swath happens to match its length. Kentucky’s version uses a square 18.5 feet on each side, which is 342 square feet, close enough to the 340 the arithmetic needs.
| Swath width | Length of the test area |
|---|---|
| 4 feet | 85 feet |
| 5 feet | 68 feet |
| 6 feet | about 57 feet |
| 8 feet | about 43 feet |
| 10 feet | 34 feet |
Choose the Ground
Kentucky suggests concrete, and it warns that you may walk faster on hard ground than on grass. NDSU says to calibrate on the same surface you will spray, because loose soil or a hard road gives different speeds than the field (2). The two views agree on the cause, which is pace. If you will spray turf or an orchard alley, I prefer to practice on that ground and mark the square there, as long as you can still see the water land.
Time the Walk and Collect the Output
This is the measuring step, and it is where backpack sprayer calibration usually goes wrong, because three things must stay the same on every run: the pressure, the nozzle height and the pace. Repeat the run until the numbers agree. Kentucky says to repeat to confirm consistency, and it advises calibrating each time you apply a pesticide (1). My answer to “what does psi mean on a sprayer” explains pressure ranges and limits.
Collect the Output in a Container (Method One)
This is Kentucky’s no-math method. With the tank about half full of clean water, time how long you take to spray the whole square at constant pressure. Then spray into a container marked in fluid ounces for the same number of seconds. My preference is this method, because the cup gives a number you can read at once.
Refill to a Marked Level (Method Two)
Penn State’s version marks the water level in the tank after the sprayer is pressurized, so the hose and pump are already full. Fill a measuring cup to a known level first; 30 to 40 fluid ounces is enough. Spray the area at your practice pace, then complete the full shutdown in the shutdown box before you open the tank, refill it to the mark from the cup, and subtract what is left in the cup from the starting amount. If one cup is not enough, add up every cupful you pour in. The ounces you added back are the ounces applied to the test area.
Pro Tip: A Card for the Tank
Tape a card to the tank with four lines: the nozzle, the pressure setting, the seconds for the square and the ounces collected. When you change a nozzle or the pressure, you will know exactly which number is out of date.
| Line | Run 1 | Run 2 | Run 3 |
|---|---|---|---|
| Nozzle and setting | Your nozzle | Your nozzle | Your nozzle |
| Pressure setting | Your setting | Your setting | Your setting |
| Seconds for the square | Your time | Your time | Your time |
| Ounces collected | Your reading | Your reading | Your reading |
The Arithmetic Behind the Ounces
An acre is 43,560 square feet. Divide that by 128 and you get 340.3 square feet, which is one 128th of an acre. A gallon holds 128 fluid ounces, so the ounces you collect from one 128th of an acre equal the gallons you would spray on a whole acre.
The Backpack Sprayer Calibration Formula in Plain Words
Gallons per acre equals the ounces collected, divided by 128, divided by the share of an acre you sprayed. For a 340 square foot square the share is one 128th, so the two 128s cancel and the ounces read straight off as gallons per acre. NC State Extension also describes an area method: spray a measured volume of water over a test course and divide the volume by the area sprayed.
I like the first method for a backpack because the arithmetic is already done in the square. I find the practice walk more useful than the formula, because the formula is only as good as the pace behind it.
What to Change When the Result Is Off
Complete the full shutdown in the shutdown box before you change a nozzle or touch any part of the sprayer. Then compare your result with the spray volume your product label calls for. NC State Extension gives a clear order of changes: if the error is under 10 percent and the sprayer has a pressure adjustment, adjust the pressure; if the error is greater than 10 percent, change the nozzle size. Its goal is an application error under 5 percent, and it says never to change your speed to chase the output.
| What you see | What to change | Why |
|---|---|---|
| Result within 10 percent of the label volume, and the sprayer has a pressure adjustment | Adjust the pressure, then run again | More pressure raises the rate and less lowers it (NC State) |
| Result more than 10 percent off | Change the nozzle size, then run again | A larger nozzle gives a higher rate and a smaller one a lower rate (NC State) |
| Runs disagree with each other | Complete the full shutdown, then check for a leak, a plugged strainer, a nozzle fault or an unsteady pace | A leak, an obstruction or an uneven walk changes the output from run to run |
| Pattern is streaked or one-sided | Replace the nozzle | NC State says to replace a nozzle with a bad pattern |
Why Pressure Is a Weak Lever
NDSU says that to double a nozzle’s spray rate the pressure must rise by a factor of four (2). Pressure also changes droplet size: Kansas State Extension says higher pressures make many more droplets under 100 microns and advises staying below 40 to 45 psi on field sprayers (3). Those figures come from field and boom sprayers and are not a rule for a backpack wand, so keep to the pressure your manual and label allow.
Nozzle Type Changes the Droplets Too
A test rig with boom nozzles showed that nozzle type, nozzle size and pressure each change the droplet size spectrum (4). A bench test with a knapsack sprayer at 15 and 25 psi found that a hollow cone nozzle gave the highest coverage and an air-induction flat fan gave the largest droplets (5). Treat both as examples of one test each, and recalibrate whenever you change a nozzle, because the output changes with it. My answer to “what is a cone spray nozzle” explains hollow and full cone types.
My rule of thumb is that if two runs disagree, I stop and look for a leak, a clogged strainer, a nozzle fault or a wobbling pace before I change the nozzle.
When to Calibrate Again
Calibration is not a one-time job. NC State Extension says to calibrate again whenever the application rate, the type of product or the nozzles change. NDSU adds that equipment should be recalibrated periodically to make up for wear in pumps and nozzles, and Kentucky says to calibrate each time you apply a pesticide.
- New or replaced nozzle: run the full measurement again, because the flow changes.
- Different pressure setting: the output changes, so measure it again.
- New product on the label: the label may ask for a different spray volume, and you need your sprayer’s own figure to compare.
- A season of use: nozzle wear raises the flow, so check before the first spray day.
Mistakes That Skew the Result
Pace, pressure and wand height set the result. The mistake I warn people about most is speeding up at the end of the square because the tank feels light. They must match from the first step to the last.
- Practicing on grass and calibrating on concrete: you may walk faster on hard ground, and the pace changes the result.
- Starting a run with an unpressurized hose: the first seconds fill the hose and the numbers come out low.
- Reading the cup at an angle: set it on a level surface and read it at eye level.
- Using one run: a single result hides an unsteady pace, so repeat until the runs agree.
If You Must Calibrate With the Product
NC State Extension says to calibrate with water whenever possible. Before you load product, complete the full shutdown in the shutdown box. If you must use the product mixture, do it on a site the label approves and in wind under 5 miles per hour, with the protective equipment the label requires. Read the label and your manual first.
The Label Is the Law
The product label is the law. It tells you what protective equipment to wear, how and where you may use the product, what weather it allows, how long to stay out of the treated area, how long to wait before you harvest, how to protect bees and other pollinators, and how to dispose of leftover product and the empty container. Using a registered pesticide in a way its label does not allow is against federal law. Your sprayer’s manual does not replace the label, and the label does not replace the manual: read the label before you open the container, and follow both.
Protective Equipment
Wear the protective clothing and equipment the product label requires, and put it on before you open the container. Wear the eye protection and gloves the label names every time you mix, load, spray, clean the tank or clear a nozzle. Cornell’s pesticide safety program also advises chemical-resistant gloves, goggles and a respirator when you handle moderately toxic products, even when the label does not call for them. Wear every respirator the label requires, of the type the label names, and follow the respirator maker’s instructions for fit, use and care. If you follow Cornell’s advice and wear one the label does not require, or if it is unclear which respirator or filter is right, get qualified guidance on the respirator and filter before you handle the product. Protective equipment lowers your exposure; it does not make spraying safe.
Wind and Drift
Drift is spray carried off target by the air, and wind speed is the factor extension sources stress most. Their figures differ and none fits every situation, and your product label may be stricter than all of them. K-State Extension suggests spraying when the wind is under 10.1 miles per hour and says there is no maximum wind speed that fits every situation. LSU AgCenter says to avoid applying when the wind is above about 10 miles per hour. NC State says under 5 miles per hour when you calibrate with the product in the tank. Cornell gives no number and says not to take a chance by spraying in the wind. Do not spray during a temperature inversion, when cool air near the ground holds small droplets in the air, and do not assume that calm air, early morning or evening is suitable: check the actual conditions and follow every weather restriction on the product label. High temperature and low humidity make spray evaporate faster. Do not spray just before rain. Droplets smaller than about 150 micrometers drift most easily, and higher pressure makes more of them.
Children, Pets and Exposure
Keep children, pets and other people out of the area while you mix, load and spray, and keep them off the treated area for as long as the label says. Before you spray, remove toys and take away or cover pet food and water dishes. If someone is exposed to a pesticide, follow the first-aid section of the product label and call Poison Control at 1-800-222-1222, and keep the product label with you. Call 911 in an emergency.
Clean and Store the Sprayer After Calibrating
Before you drain the tank or put the sprayer away, complete the full shutdown in the shutdown box, including its emergency exception. A water-only calibration leaves water in the tank, the hose and the wand, and a product calibration leaves product there too. Drain the tank as the manual describes.
Cleaning
Before you clean the sprayer, complete the applicable full shutdown in the shutdown box, including its emergency exception, and wear the protective equipment the label and your manual require. Clean the sprayer as soon as you can after use, because dried product is harder to remove than product still in solution. Empty the tank, rinse the tank, hose, wand and nozzle, and clean the strainers and screens, following the product label and your manual; extension guidance warns that water alone may not remove every product. Clean it away from desirable plants, wells and other water, and wash the outside. Do not pour leftover product or rinse water down a sink, a toilet or a storm drain, or onto bare ground.
Storage
Before you store the sprayer, complete the applicable full shutdown in the shutdown box, including its emergency exception. Store pesticides in their original containers, with the label on, locked up or under the control of a person who can keep others away, and out of the reach of children. Never put a pesticide in a container used for food, drink or household products. Keep pesticides away from food, animal feed and protective equipment, and store pesticides and fertilizers apart, because they can react with each other and start a fire. Store the sprayer drained, cleaned and dry, as your manual describes, with the battery stored as the battery manual describes.
Three Habits to Keep After You Calibrate
Remember three things: measure with water, record the nozzle and pressure beside the result, and measure again when the nozzle, the pressure or the product changes. My tip is to tape the card from the earlier step to the tank so the number travels with the sprayer. Next, read your product label for its spray volume and compare it with your result. Knowing how to calibrate a backpack sprayer gives you a figure you measured yourself instead of one you assumed. If you still need a unit to measure, my picks for the best battery powered backpack sprayer compare seven models by fit and battery.
Frequently Asked Questions
How do you calibrate a backpack sprayer?
You calibrate a backpack sprayer by spraying clean water over a measured square while you time yourself, then spraying into a measuring container for the same time. The ounces collected equal the gallons per acre for that nozzle, pressure and pace.
What are common symptoms of poor calibration?
Common symptoms of poor calibration are runs that disagree with each other, a result more than 10 percent off the label’s spray volume, and a streaked or one-sided pattern. NC State Extension says to replace a nozzle with a bad pattern or a discharge more than 10 percent off the maker’s table.
How to calibrate a spot sprayer?
To calibrate a spot sprayer, mark a 340 square foot area on vegetation like what you will spray, either low ground cover or a wall of plants such as shrubs. Practice spraying in short bursts for light, even coverage, then run the same timed water test, and Penn State Extension says the ounces then read as gallons per acre.
How to calibrate a lawn sprayer?
To calibrate a lawn sprayer that you carry or hold, use the same square and the same arithmetic as for a backpack. The University of Kentucky’s no-math method covers backpack sprayers and lawn care spray guns, so spray water over 340 square feet, collect the output for the same time and read the ounces as gallons per acre.
What is the formula for calibrating a backpack sprayer?
The formula for calibrating a backpack sprayer is gallons per acre equals ounces collected divided by 128, divided by the share of an acre you sprayed. For 340 square feet, one 128th of an acre, the ounces collected read straight off as gallons per acre.
References
- Munshaw GC. A No-math Method of Calibrating Backpack Sprayers and Lawn Care Spray Guns. AGR-220. University of Kentucky Cooperative Extension Service; 2016.
- Proulx R. Spray Equipment and Calibration. AE73. North Dakota State University Extension; revised October 2025.
- Wolf RE. Strategies to Reduce Spray Drift. MF-2444. Kansas State University Agricultural Experiment Station and Cooperative Extension Service; March 2000.
- Nuyttens D, Baetens K, De Schampheleire M, Sonck B. Effect of nozzle type, size and pressure on spray droplet characteristics. Biosyst Eng. 2007;97(3):333-345.
- Alheidary MHR. Influence of nozzle type, working pressure, and their interaction on droplets quality using knapsack sprayer. Iraqi J Agric Sci. 2019;50(3).
Safety Note: Read your sprayer’s manual and the product label before you open any container. The label is the law: it tells you what protective equipment to wear, how and where you may use the product, what weather it allows, how long to stay out of the treated area, how long to wait before you harvest, how to protect bees and other pollinators, and how to dispose of leftovers and the empty container. Using a registered pesticide in a way its label does not allow is against federal law. This page never gives an amount of product, a dilution or a mixing order: the label does. Wear the protective clothing and equipment the label requires, put it on before you open the container, and wear the eye protection and gloves it names whenever you mix, load, spray, clean the tank or clear a nozzle. Protective equipment lowers your exposure; it does not make spraying safe. Wear every respirator the label requires, of the type it names, and follow the respirator maker’s fit, use and care instructions. Before you clean or store the sprayer, or wire a 12V pump, complete the shutdown below first. Before you mix or load, complete the shutdown below, including its emergency exception. Mix and load outdoors, away from other people (including children), pets and livestock, and where a spill cannot reach a well, a drain or other water. Stand upwind, never use your mouth to siphon a product, keep the fill hose above the liquid so it cannot siphon back into your water supply, and never leave the sprayer unattended while you fill it. Mix only what the job needs, and do not store leftover mix in the sprayer. Never point the wand at yourself, another person or a pet, and never test a spray against your hand. Emergency first: if a battery becomes unusually hot, swells, hisses, gives off an unusual odor or smokes, stop using the sprayer without handling or removing the battery, keep people away and follow the battery manual’s emergency instructions; if it smokes, burns or presents immediate danger, move away and call 911 or the fire department without finishing the routine shutdown. Otherwise, before you open the tank, fill it, change or clean a nozzle, clear a clogged nozzle, clean or rinse the sprayer, adjust or repair anything, charge or change the battery, load, unload, transport, store or leave the sprayer, or lift, put on or take off a backpack unit, complete the shutdown. During normal spraying, move only as your manual and the product label permit, and never ride while operating a hand-held wand or lance. Battery sprayer: release the trigger or close the wand valve, then switch the pump off. Relieve all trapped pressure using only your exact manual’s procedure and a discharge destination consistent with the product label, without opening the tank or loosening any part beforehand unless that procedure expressly requires it, and never toward yourself, another person or an animal. Then remove the battery. 12V vehicle sprayer: first stop and secure the vehicle as its manual directs, then release the trigger, close the wand or boom valve and switch the pump off. Relieve all trapped pressure using only your exact manual’s procedure and a discharge destination consistent with the product label, without opening the tank or loosening any part beforehand unless that procedure expressly requires it, and never toward yourself, another person or an animal. Then disconnect the pump’s 12V supply at the connection your manual specifies, and reconnect it only after the work is complete, every part is secured and the pump switch is off. Wear the label’s protective equipment while you clean the tank, the strainer or a nozzle. Clear a clogged nozzle only with the method in your exact manual, never with your mouth and never by blowing into it. Refit every part and check for leaks with clean water before product goes back in. For the first water test, complete the shutdown first, fill the tank with clean water and close it as your manual directs, connect the power only when you are ready, and watch the wand, hose, fittings and tank seams for leaks without touching pressurized parts; complete the shutdown again before you open the tank, fix a leak or add product. Wind, heat and fine droplets carry spray off target: the label may be stricter than any extension guideline, and extension sources give different wind figures, so no single number fits every situation. Do not spray during a temperature inversion, and do not assume that calm air, early morning or evening is suitable. Do not spray just before rain. Keep children, pets and other people out of the area while you spray and off the treated area for as long as the label says, and remove toys and cover pet food and water dishes first. The label’s pollinator wording decides when you may spray around flowering plants, and early morning or evening is not automatically suitable. A sprayer that has held weed killer should stay a weed-killer sprayer: extension services advise a dedicated sprayer, and rinsing may not remove every residue. Follow the product label’s instructions for rinsing empty containers, handling rinse water and disposing of them, and never reuse an empty pesticide container; for leftover product, call your state pesticide agency or a household hazardous waste program, and never pour it down a sink, a toilet or a storm drain. Store pesticides in their original containers, locked up and out of the reach of children, away from food and animal feed, and keep pesticides and fertilizers apart. If someone is exposed, follow the first-aid section of the label, call Poison Control at 1-800-222-1222 and keep the label with you; call 911 in an emergency. If product spills, keep people and animals away and follow the label’s emergency directions; try to contain a small spill only if the label says that is safe and you have the protective equipment it requires, and otherwise get help (the emergency number on the label, Poison Control if anyone is exposed, 911 for a fire, immediate danger or a large spill). Use only the battery and charger the maker supplies or lists for your exact sprayer, charge and store the battery as your manual describes, and do not use a damaged battery or charger: lithium-ion batteries can overheat and catch fire. Wire a 12V pump the way your manual says and use the fuse it lists. On an ATV or UTV, wear the helmet and protective gear the Consumer Product Safety Commission recommends, get hands-on training, sit only in the positions the manufacturer designed, never ride with more passengers than there are seats, and in a UTV fasten the seat belts and keep every part of your body inside the vehicle; stay within the rack and tow capacity in your vehicle’s owner’s manual, and remember that sloshing liquid shifts weight and changes how the vehicle handles; Montana State University Extension advises against riding and spraying if you have to hold a wand or lance. Stop at once, complete the full shutdown and inspect if the sprayer leaks, loses pressure or runs without spraying, and restart only as the manual allows. If a battery becomes unusually hot, swells, hisses, gives off an unusual odor or smokes, do not handle or remove it: keep people away, follow the battery manual’s emergency instructions, and if it smokes or burns, move away and call 911 or the fire department. Before you fill the tank, complete the shutdown, and fill it only to the level your manual allows. Carrying a full tank is tiring: rest when you are tired.