
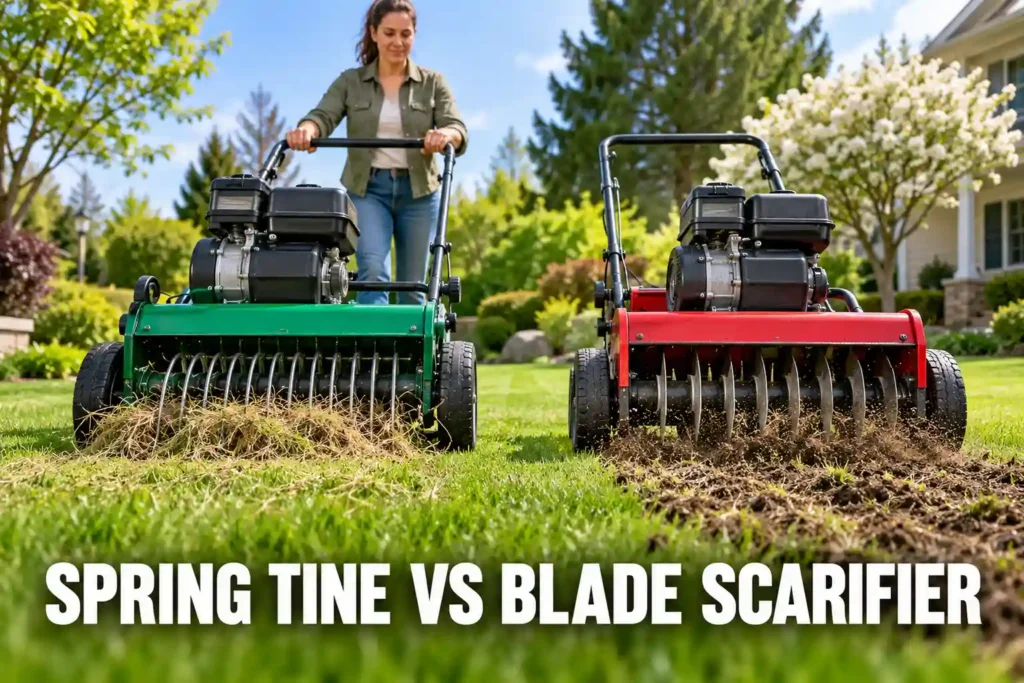
The spring tine vs blade scarifier choice is a choice of drum, because most electric machines ship with both and the owner swaps them. Spring tines comb loose dead grass up out of the turf, while blades cut grooves into the soil, which is the heavier and riskier job.
The right drum depends on the mat under the grass, so I cut a plug from the house lawn and measure it before I reach for either one. Below I cover what each drum does, how the makers’ counts and depth steps differ, when to fit which, and how to swap them safely.
Spring Tine vs Blade Scarifier: What Each Drum Does
A tine drum and a blade drum do different work on the same frame. The drum decides the job, because the motor, the depth lever and the bag are shared, and only the drum touches the turf.
| Feature | Spring-tine drum | Blade drum |
|---|---|---|
| What spins | Spring steel tines | Slicing blades |
| Main job | Lifts thatch and loose dead grass to the surface | Cuts grooves into the soil surface and tears out moss and dense mats |
| Where it works | At the top of the turf, near the soil line | Into the soil surface |
| Depth steps, Sun Joe AJ805E chart | +10 mm and +5 mm, with 0 mm shared | -5 mm and -10 mm, with 0 mm shared |
| Risk to living grass | Lower, but roots in a thick mat still come up | Higher, and WEN says scarifying carries some risk of pulling up grass roots |
| Count on the Sun Joe AJ805E | 24 spring steel tines | 26 slicing blades |
Retailers call the tine drum a dethatcher and the blade drum a scarifier, so the scarifier vs dethatcher labels on a box describe drums, not two separate machines. Penn State describes a power rake as vertically rotating wire tines and a vertical mower as rotating blades that slice into the thatch, and I read the retail tine drum and blade drum as the closest matches. My guide sets a dethatcher against a verticutter if you want the comparison drawn out.
According to Greenworks, its blade cylinder is designed to rip moss, weeds and their root systems out of the soil while loosening the soil, and the same machine converts to a dethatcher with the tine cylinder. That is the split I use: tines for thatch, blades for moss and soil work. My review of the Greenworks DHA103 takes a closer look at this corded machine and its two drums.
What the Makers Put on Each Drum
Every drum carries a count of tines or blades, and the counts differ a lot from one model to the next. The depth chart then tells you which steps belong to which drum, and that matters more than the count.
Counts Differ From Model to Model
| Model | Tine drum | Blade drum | Depth steps |
|---|---|---|---|
| WEN DT1516 | 24 steel tines | 20 blades | 5, from +1/4 to -1/2 in |
| WEN DT1315 | 24 steel tines | 16 blades | 5, from +1/4 to -1/2 in |
| Sun Joe AJ801E | 27 spring steel tines | 20 blades | 5, from +10 to -10 mm |
| Sun Joe AJ805E | 24 spring steel tines | 26 blades | 5, from +10 to -10 mm |
| Sun Joe AJ808E | 24 spring steel tines | 16 blades | 5, from +5 to -12 mm |
| Sun Joe 24V-X2-DTS15 | 24 spring steel tines | 7 blades | 5 per drum |
| Greenworks DHA103 | Count not published by the maker | 20 blades | 5, from +1/4 to -7/16 in |
A higher blade count does not rank a machine. The blade drum on the Sun Joe AJ808E has 16 blades against 26 on the AJ805E, and its manual gives no spacing, so a number on a spec sheet cannot tell you how aggressively a drum cuts. I compare the depth steps and the maker’s own words for each drum instead. I examine the 15-amp dethatcher and scarifier in my review of Sun Joe AJ808E.
Depth Steps Belong to the Drum
On the Sun Joe AJ805E, the maker lists +10 mm as a step for removing thin thatch and +5 mm for raking a healthy lawn, and it says not to scarify at either. The 0 mm step is for transport, storage, scarifying and raking. The -5 and -10 mm steps are for scarifying, and the maker does not recommend raking with them.
WEN’s chart for the DT1516 follows the same pattern. The two shallowest steps are for transport and dethatching, the -1/4 in step covers both jobs, and the two deepest steps are for scarifying, with dethatching listed as not recommended or not to be used. On these two charts the deepest steps are scarifier steps. Each model’s own chart decides which depths a drum may use: the Greenworks DHA103 manual, for one, lists the same five depths for both of its drums. My review of the WEN DT1516 gives my verdict on the 16-inch dethatcher and scarifier.
Check the Drums in the Box
The corded and cordless machines in the table ship with both drums, and only one is fitted at a time. A machine can also ship with a tine drum only, so I read the maker’s contents list before I pay for a scarifier. I recommend a machine with both drums only when the plug and the renovation plan justify both: the tine drum when the mat passes the threshold, and the blade drum for moss or bare patches. My list of the best dethatcher and scarifier machines is limited to models that come with both drums.
What Each Drum Does to the Lawn
The drums differ in how deep they reach and how much living turf they take with the dead material. Neither one fixes the cause of thatch, which builds when the grass makes dead stems faster than the soil life can break them down.
Tines Work the Top of the Turf
The tine drum picks up loose dead material at the surface, so it is the gentler of the two. It still tears living grass, because the roots of a thatchy lawn grow in the thatch. According to the University of Illinois Extension, mechanical dethatching is very destructive for that reason, and thatch will most likely return unless the cause is corrected. I walk through the drum, tines, depth setting and bag in my guide on how a dethatcher works.
That is why I start on the lightest step, and I go one step lower only if the first pass left the mat in place.
Blades Cut Into the Soil
The blade drum slices grooves into the soil surface. On the makers’ charts a minus sign means the blades work below the soil surface, which is why those steps open the ground for seed and pull out moss. It is also why they can scalp thin turf. I treat moss in the shaded patches under trees as a sign of shade, wet soil and compaction first, so blades clear the moss but the patch returns unless the cause changes. My ranking of the best scarifier for a lawn covers corded and cordless picks for moss and matted turf.
What Field Trials Show
The trials I know used slicing machines that the papers call vertical mowers, which is the extension term closest to the blade drum, and the results are modest. On Tifway bermudagrass, vertical mowing twice a year cut thatch by 8 percent and reduced shoot density (1). On Meyer zoysia, annual vertical slicing cut thatch depth by 12 to 18 percent each year (2).
Slicing also helps seed. In a putting green trial that seeded into dead turf, two passes with vertical mowing units gave a better first-year seedbed than hollow-tine or solid-tine cultivation, the trial could not evaluate establishment into live turf, and the differences were not significant in year two (3). In a Kansas trial, verticutting worked as well as core aeration for establishing seeded tall fescue (4). I read both results the same way: verticutting worked as seedbed preparation under those trial conditions, which is a reason to consider the blade drum before seeding, though a retail drum on a home lawn is not the same test. Core aeration is the other common choice, and I compare a dethatcher and an aerator in a separate guide.
When to Fit the Tine Drum and When to Fit the Blade Drum
Pick the drum from what a plug shows, not from the name on the box. The table below matches common lawn situations to a drum, and the steps under it show how I take the plug.
| Lawn situation | Drum | Why |
|---|---|---|
| Firm turf, mat under half an inch | Neither | A thin layer insulates the turf, and a drum only tears it |
| Spongy mat past half an inch, or about an inch on some warm-season lawns | Tines, lightest step, after the grass check below | They lift thatch with less cut into the soil |
| Mat still there after a light tine pass | A second light tine pass, after the grass check below | Penn State calls a second pass at a high setting the safer approach |
| Moss in shaded patches | Blades, shallow step | They tear moss out, and you then fix the shade or drainage |
| Thin or bare patches that need seed | Blades, shallow step | They open the soil so the seed touches it |
- Cut a pie-shaped wedge or plug with a knife or spade.
- Measure the brown, spongy layer between the green leaves and the soil.
- Compare it with your extension service’s threshold for your grass: most start at about half an inch.
- Pick the drum from the table, and fit it using the safe swap steps below.
Check your grass before any of this. The University of Florida says power rakes should not be used on St. Augustinegrass and centipedegrass, which only produce above-ground stems, and Clemson asks for wider blade spacing and one direction only on both. Those warnings are written for power rakes and verticutters, not for a retail tine drum, so read your manual and your extension service before you run either drum on those grasses. My guide on the power rake and dethatcher difference covers what each machine does.
A worked example: a plug on a Kentucky bluegrass lawn shows three quarters of an inch of mat. That is past the half-inch line, so the tine drum earns a first pass. On the Sun Joe AJ805E I run it at the +5 mm step, which the maker lists for raking a healthy lawn, and only then think about 0 mm. The -5 and -10 mm blade steps stay unused unless there is moss or a patch to seed. My review of Sun Joe AJ805E covers the whole machine, bag included.
Timing belongs to the grass type, never to one month. Penn State and the University of Illinois place cool-season lawns in late summer to early fall, and NC State and the University of Florida place warm-season lawns in the active growth of summer. Both drums tear turf that is not growing, so I wait for the grass to grow hard.
Running Either Drum Without Hurting the Lawn
Most damage comes from the wrong time, too much depth or wet soil, not from the choice of drum. A few habits protect the turf with either one.
Depth, Moisture and Passes
- Mow first: Sun Joe says to mow before working and to fertilize afterwards.
- Work a dry lawn: WEN says not to work on a wet lawn, and Sun Joe says the machine sticks and discharges poorly on wet grass.
- Start light: Penn State suggests testing a low-visibility area, setting the blades high and making a second pass.
- Push slowly: Sun Joe warns against dethatching too deep at too fast a rate, which overloads the motor.
I run the first pass on a corner out of sight and look at it the next day before I do the rest. Expect the lawn to look rough afterwards, and plan to seed any thin patches, because Penn State says heavy thatch removal calls for seeding the thinned turf. I pair the two jobs, dethatching and overseeding, in a separate guide.
Wrong Time, Wrong Depth
Working at the wrong time, too deep, on wet soil or on stressed grass can badly damage a lawn. Follow the timing your state extension service gives for your grass type, and the depth steps in your own manual.
Safety Before the First Pass
Both drums throw stones, sticks and debris. In a national study of lawn mower eye injuries, 77 percent came from projectiles such as grass, dirt and rocks, and only 2 percent of those were documented as using eye protection (5). So I wear eye protection with side coverage that meets ANSI Z87.1, hearing protection, long pants, sturdy closed shoes and gloves every time.
- Walk the lawn first and remove stones, sticks, toys, wire and dog waste.
- Mark sprinkler heads, drip lines, low-voltage lighting wire and buried pet fence wire before the first pass, because the tines or blades can catch or cut them.
- Keep bystanders and pets at the distance your manual gives. The Westinghouse W16ADAC manual says at least 100 ft, and you stop when someone comes closer.
- On a corded machine, use an undamaged outdoor extension cord of the gauge and length the manual gives, a GFCI outlet, and keep the cord behind you and clear of the drum.
- Never use a corded machine on wet grass or in wet conditions.
Near the orchard strips I lift or mark the drip lines first, since a drum set deep can catch one. I pick up the fallen twigs and fruit before the drum goes over the lawn.
Swapping the Drums Safely
The drum swap is where hands meet sharp steel, so the order matters more than speed. Every maker’s manual puts power off first, and the exact steps for removing a drum are in your own manual.
- Switch the machine off.
- Wait until the drum has stopped turning completely.
- Unplug the cord, or remove the battery. A two-battery machine such as the Sun Joe 24V-X2-DTS15 needs both batteries out.
- Put on gloves. Tines and blades are sharp, and the manuals warn they can be hot after use.
- Take off the bag, then follow the manual for the drum. On the Sun Joe corded machines that means turning the machine over, loosening two bolts with the hex key and lifting off the bearing seat.
- Refit the new drum as the manual shows, with the bearing seat’s semi-circle facing down on the Sun Joe machines, and check that it is secure before you reconnect power.
Shut Down Before You Touch Anything
Before you clear a jam, empty or fit the bag, change the depth, turn the machine over or touch tines or blades: switch off, wait for the drum to stop completely, then unplug the cord or remove the battery. Never lift or tilt the machine while the drum turns.
I do the swap on a clear bench or a flat floor, never on the lawn, and I keep the cord away from the outlet until the drum is back on. The swap is quick enough that I prefer one machine with both drums to renting a second tool.
Wear, Replacement and What to Check Before You Buy
Tines and blades wear, and the maker’s way of selling the parts differs. Check this before you buy, because a machine you cannot restock is a short-lived machine.
What the Manuals Say About Wear
The Sun Joe corded manuals tell you to replace a worn or blunt cutting device at once, and the AJ805E manual lists spare tines and spare blades as separate parts. Sun Joe sells dethatcher replacement tines for each corded model, but the 24V-X2-DTS15 cordless model from my Sun Joe DTS15 review is stocked by whole cylinder, not by single tine. The AJ805E manual treats the tines as wearing parts that its warranty does not cover. WEN’s troubleshooting says to replace the cylinder when the cutting device is worn, and the Westinghouse W16ADAC manual says worn or damaged blades give poor performance and abnormal noise.
Check Before You Buy
| Check | What to look for | Why it matters |
|---|---|---|
| Drums in the box | A tine drum, a blade drum or both | A tine-only machine cannot scarify |
| Depth chart | Which steps the maker allows for which drum | The model’s own chart decides which depths each drum may use |
| Spare parts | Single tines and blades, or whole cylinders | Whole cylinders cost more to replace |
| Warranty on wearing parts | Tines covered or excluded | Sun Joe’s AJ805E manual excludes them |
| Power and reach | Corded reach or battery count | The cord limits range, and some cordless models need both batteries |
Whichever machine you pick, read the safety section of its manual first, because the shutdown order and the cord rules differ between makers.
My Pick of Drum for a House Lawn
Three things decide the drum. Measure the mat with a plug before you buy or rent anything. Start with the tine drum on the lightest step, in the weeks when your grass grows fast. Fit the blade drum only for moss, a dense mat or bare patches that need seed. My guide to dethatcher vs scarifier explains which machine your lawn needs and when to use it.
The tip that has saved me most is to run the first pass on a hidden corner and look at it the next day. Next, read the depth chart in your manual and the timing from your state extension service. With the plug measured and the season right, the spring tine vs blade scarifier decision on a house lawn becomes tines first and blades rarely.
Frequently Asked Questions
Does a scarifier remove grass?
A scarifier can remove living grass, because its blades cut into the soil and WEN says scarifying carries some risk of pulling up grass roots. Use the shallowest step that does the job, and only while the grass is growing fast.
Does a scarifier cut grass?
A scarifier cuts into the turf as well as the soil, because its blades slice grooves in the surface and take stems and some roots with the dead material. Mow first at the height your manual asks for, and expect the lawn to look rough for a while.
How to sharpen scarifier blades?
To sharpen scarifier blades, start with the maker’s manual, because the Sun Joe and WEN manuals describe replacing a worn or blunt blade or cylinder and give no sharpening steps. Before you touch any blade, switch off, wait for the drum to stop completely, unplug the cord or remove the battery, then wear gloves.
How to replace dethatcher tines?
To replace dethatcher tines, follow the manual for your exact model, because some makers sell single tines and others sell the whole cylinder. Switch off, wait for the drum to stop completely, unplug the cord or remove the battery, wear gloves, and only then touch the drum.
Do rotary scarifier blades work?
Rotary scarifier blades work for the job the makers give them: Greenworks says its blade cylinder rips moss, weeds and their roots out of the soil while loosening it. They are less suited to routine thatch, which the tine drum lifts with less cut into the soil.
References
- Carrow RN, Johnson BJ, Burns RE. Thatch and Quality of Tifway Bermudagrass Turf in Relation to Fertility and Cultivation. Agronomy Journal. 1987;79(3):524-530.
- Dunn JH, Sheffer KM, Halisky PM. Thatch and Quality of Meyer Zoysia in Relation to Management. Agronomy Journal. 1981;73(6):949-952.
- Miltner ED, Stahnke GK, Rinehart GJ, Backman PA. Seeding of Creeping Bluegrass into Existing Golf Course Putting Greens. HortScience. 2005;40(2):457-459.
- Bach AP, Bremer DJ, Lavis CC, Keeley SJ, Hong M. Effects of Drip Irrigation and Cultivation Methods on Establishment of Seeded Tall Fescue. Kansas Agricultural Experiment Station Research Reports. 2022;8(5).
- Stange NR, Jennissen CA. Lawnmower-Related Eye Injuries in the U.S., 2004 to 2023. Am J Ophthalmol. 2025;277:7-16.
Safety Note: Read your manual first. A dethatcher or scarifier throws stones, sticks and other debris with force, so walk the lawn first and remove stones, sticks, toys, wire, hoses and pet waste. Mark sprinkler heads, irrigation and drip lines, low-voltage lighting wire and buried pet fence wire, keep the drum clear of them, and follow your manual’s limits near underground cables and pipes. Wear impact-rated eye protection with side coverage that meets ANSI Z87.1, hearing protection, gloves, long pants and sturdy non-slip closed shoes, plus a dust mask when the work raises dust. Keep people and pets as far away as your manual says, and stop at once if anyone comes closer. Never use a powered dethatcher on wet grass or in rain. The machine can jump up or forward when the tines hit hard or frozen ground, roots, stumps or buried rocks, so avoid those spots and hold the handle with both hands. Never lift or tilt the machine or reach under it while the drum turns. Before you clear a jam, empty or fit the collection bag, change the depth, clean, inspect or adjust the machine, turn it over, leave it, or touch the tines or blades, switch it off, wait for the drum to stop completely, then unplug the cord or remove every battery pack, and remove the safety key if it has one. Let hot tines cool before you handle them. If the machine starts to vibrate hard, switch it off, wait for the drum to stop completely, then unplug the cord or remove every battery pack and any safety key before you check it for damage. For a corded model, use an undamaged outdoor extension cord of the gauge and length your manual gives, plugged into a GFCI outlet, keep the cord behind you and clear of the drum, and never handle the plug with wet hands. For a battery model, use only the battery and charger approved for your tool, charge and store them within the temperature range in your manual, and never use a damaged or swollen pack. Stay off steep and wet slopes and work slopes only in the direction your manual gives. For a tow-behind dethatcher, follow both your tractor’s and your dethatcher’s manuals: tow it only behind a lawn tractor or riding mower that meets the maker’s requirements, never on public roads or behind a car or truck, keep a slow, steady speed, avoid sudden turns and stops, carry less weight on slopes and never more than the manual allows, never carry riders, and fit any tine safety wires the manual requires. Before you adjust or clear it, stop the tractor, set the parking brake, remove the key and disconnect the dethatcher as its manual describes. Dethatching at the wrong time of year, too deep or on stressed turf can badly damage a lawn, so match the timing and depth to your grass type.